How to Pick a Connector Series: Selecting a Joist Hanger

A quick glance through the Simpson Strong-Tie® Wood Construction Connectors catalog shows that we manufacture at least 29 different models of face-mount wood-to-wood joist hangers, three separate models of face-mount wood-to-masonry hangers, 42 different models of top-flange wood-to-wood joist hangers, four different models of top-flange wood-to-masonry hangers and 15 models of specialty joist hangers. And that’s not even counting heavy truss girder hangers or multiple- member hangers. So it’s no wonder that sometimes it’s difficult to pick exactly the right hanger for your particular application.

There are many things to consider when picking a joist hanger. The first may be what your load requirements are, including their direction. That will sometimes determine the second consideration. Do you want to use a top-flange or a face-mount joist hanger? Top-flange hangers typically have higher down loads with fewer fasteners, but must be installed when there is access to the top of the supporting member and often before the joist is in place. On the other hand, face-mount hangers can be installed after the joist is in place, and can have higher uplift loads, but will use more fasteners.

Speaking of fasteners, any fastener preference can determine your selection of a hanger. Joist hangers can be installed with common nails, screws (SD for lighter hangers and SDS for heavier hangers), or even bolts, for heavy glulam hangers. See here for information on the various fasteners that can be used with our connectors. The Simpson Strong-Tie Wood Construction Connectors catalog does not list allowable loads for joist hangers installed with SD screws, but you can find them here; just click on the link of the product to find its allowable load. Also, if the joist hanger will be installed with pneumatic fasteners, we have a Technical Bulletin on the possible load reductions that will result.

Another thing to consider at the beginning is what types and sizes of members are being connected together. Is your connection all solid-sawn dimension lumber, engineered wood or structural composite lumber, glulam beams, or trusses? All these types of wood products require different hangers.

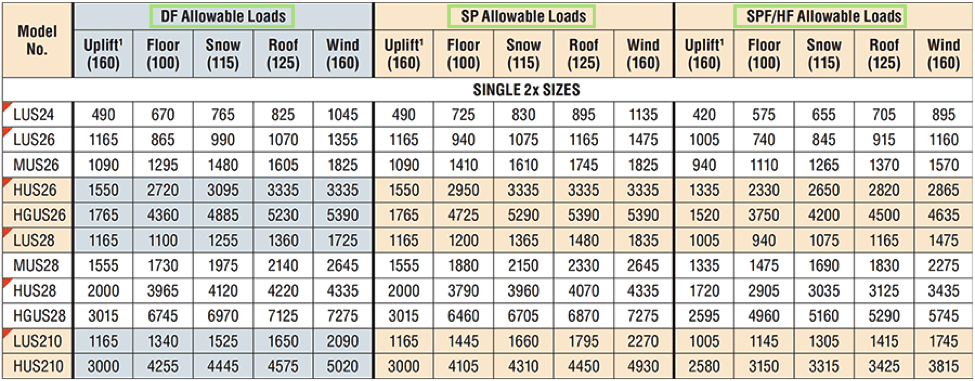
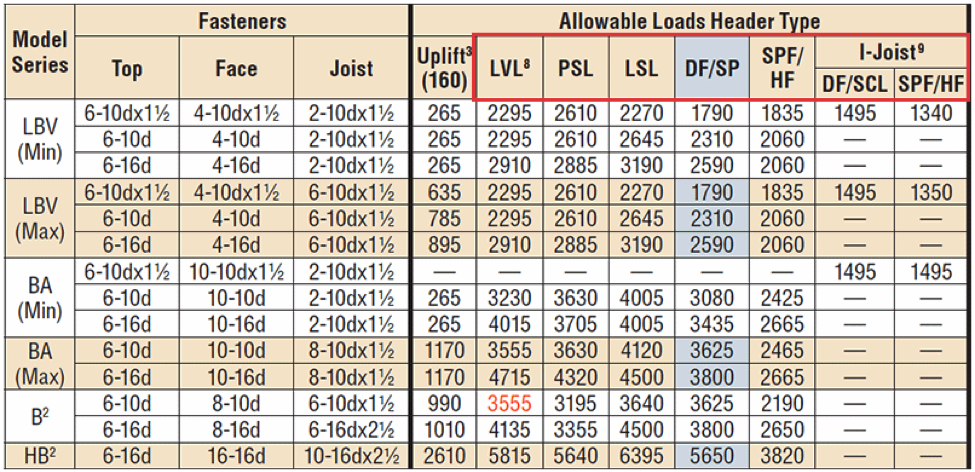
Furthermore, joist hangers will have different capacities based on the species of wood to which they are being attached. For example, the truss hangers in the table below have allowable loads listed for Douglas Fir-Larch, Southern Pine and Spruce-Pine-Fir/Hem Fir. Most standard solid-sawn joist hangers, on the other hand, will only have two load ratings, DF/SP and SPF.

Top-flange hangers are sensitive both to the species of wood and to the type of engineered wood to which they are attached. Because of that sensitivity, they have to be tested to each different type of engineered wood that could be used as a header and may have different published allowable loads for each type as shown here.

Is the joist framing into the side or top of a concrete/masonry wall? Then a special joist hanger is required. Is the joist connecting to a nailer on top of a steel beam or concrete/masonry wall? Nailers require top-flange hangers and can result in loss of allowable load if you have to use shorter nails, so you need to check that carefully. There are special tables published for nailer loads for top-flange hangers.

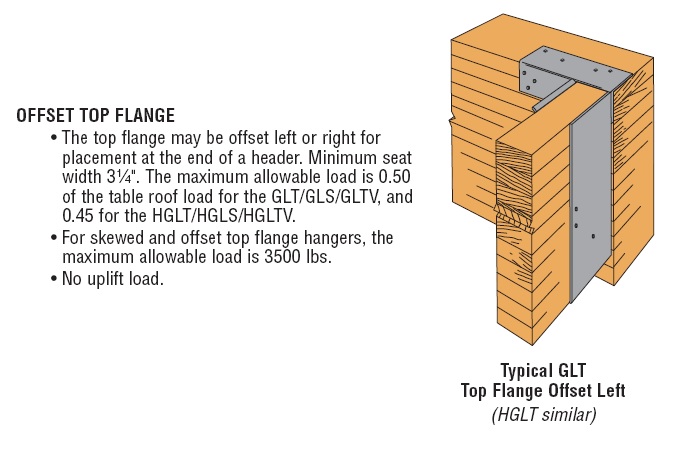
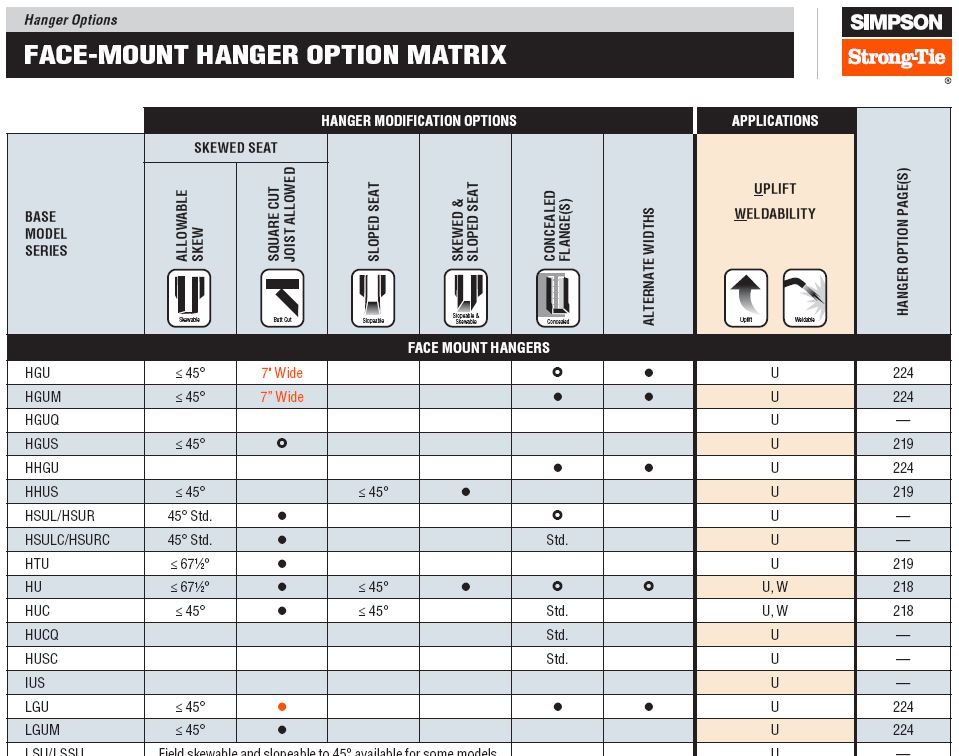
Another consideration is the orientation of the members. In a perfect world, all connections will be between perfectly perpendicular members. But in the real world, joists may be rotated side to side (skewed), or up or down (sloped), or some combination of the two. There are a couple of options in those cases. Hangers such as the SUR/SUL series are available pre-skewed at 45 degrees. Adjustable hangers such as the LSU/LSSU series can be adjusted within limits to certain slopes, skews and slope/skew combinations. Simpson Strong-Tie also has the capability to custom-manufacture quite a few types of hangers to any slope or skew within certain limits, based on the hanger. All of these options, including any load reductions required, are listed in the Hanger Options section of the catalog or website. The table there gives the various options available for each product and clicking on an individual hanger in the website table will send you to a page with the specific reductions for each option.

Another important consideration is the installed cost of the joist hanger. Simpson Strong-Tie publishes what we call an Installed Cost Index, where the total installed cost of a hanger, including fasteners and labor, can be compared for related hangers. For example, there are six joist hangers listed in the Solid Sawn section for a 2×6 joist. They are listed in order of increasing Installed Cost Index. To choose one, simply find the one with the lowest installed cost that meets your load requirements.

SE Blog 4

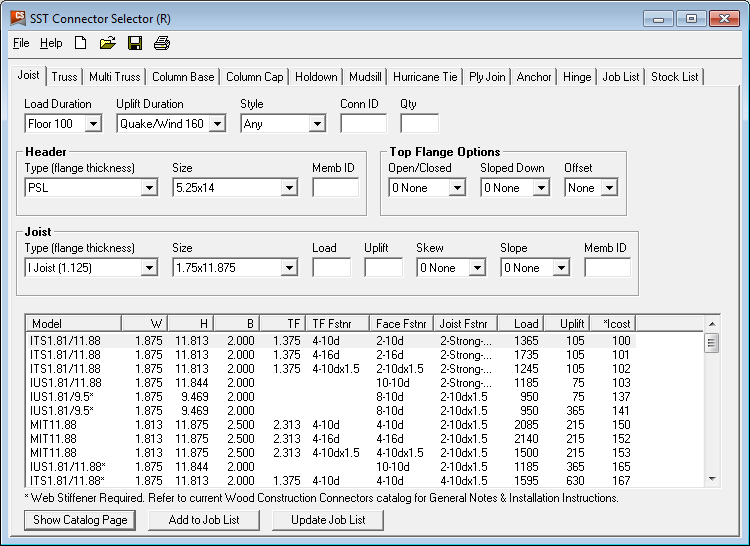
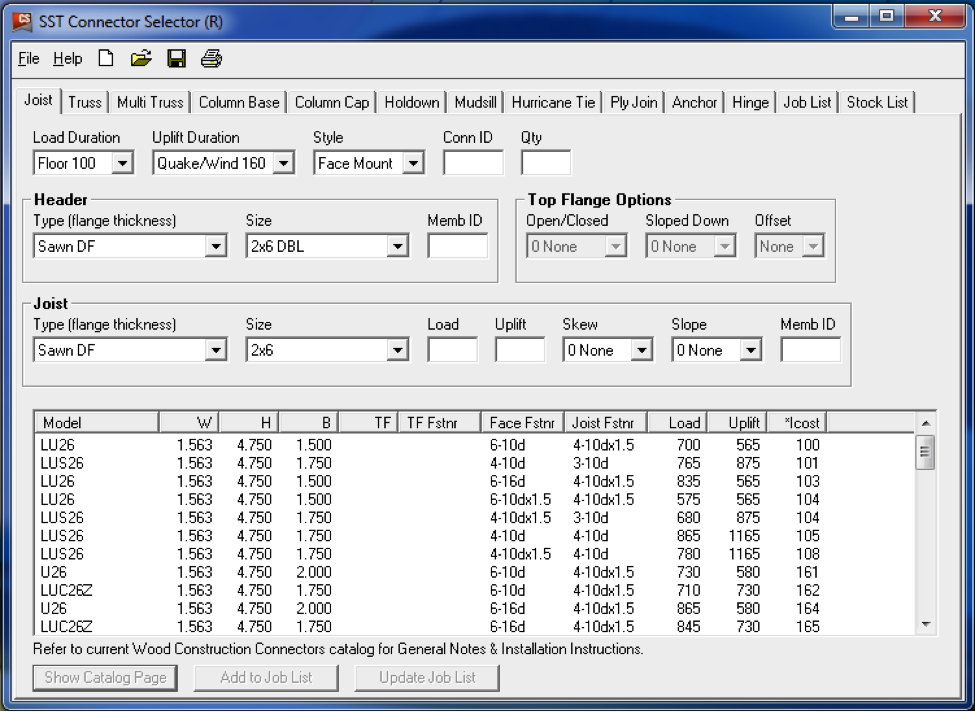
Obviously, this is a lot to think about when trying to choose a simple joist hanger. In order to make choosing a connector as easy as possible for our customers, Simpson Strong-Tie offers two different software tools to help. The first is our old standby, the downloadable Connector Selector. This is a versatile program that will help the user pick a joist hanger, truss hanger, multi-truss hanger, column base, column cap, holdown, mudsill anchor, hurricane tie, multi-ply lumber fastener, embedded anchor bolt or hinge connector. It can be downloaded from here. You can see from this example that the Connector Selector gives several options for nailing of joist hangers that may not be directly listed in the catalog.

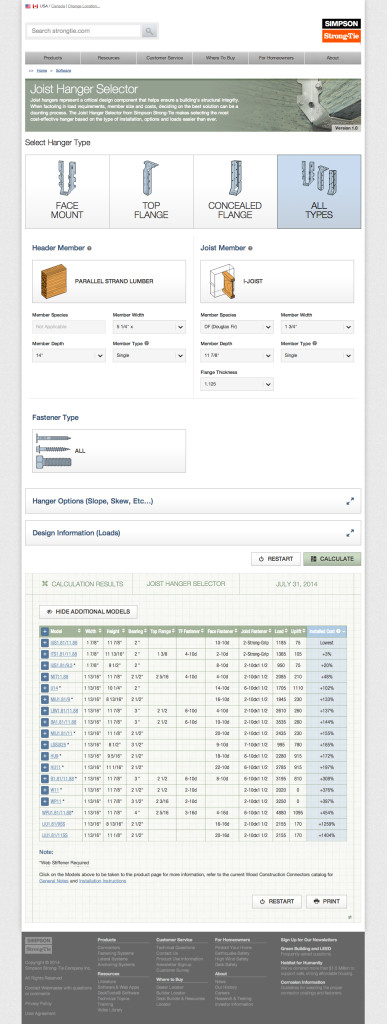
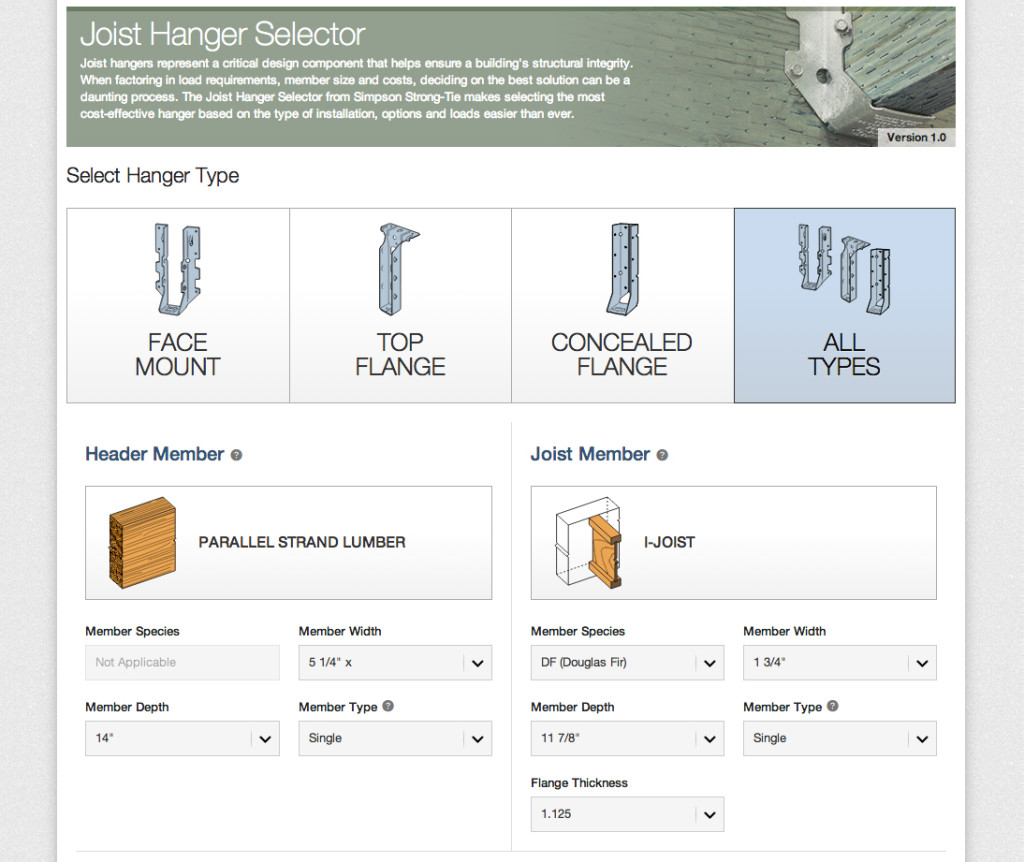
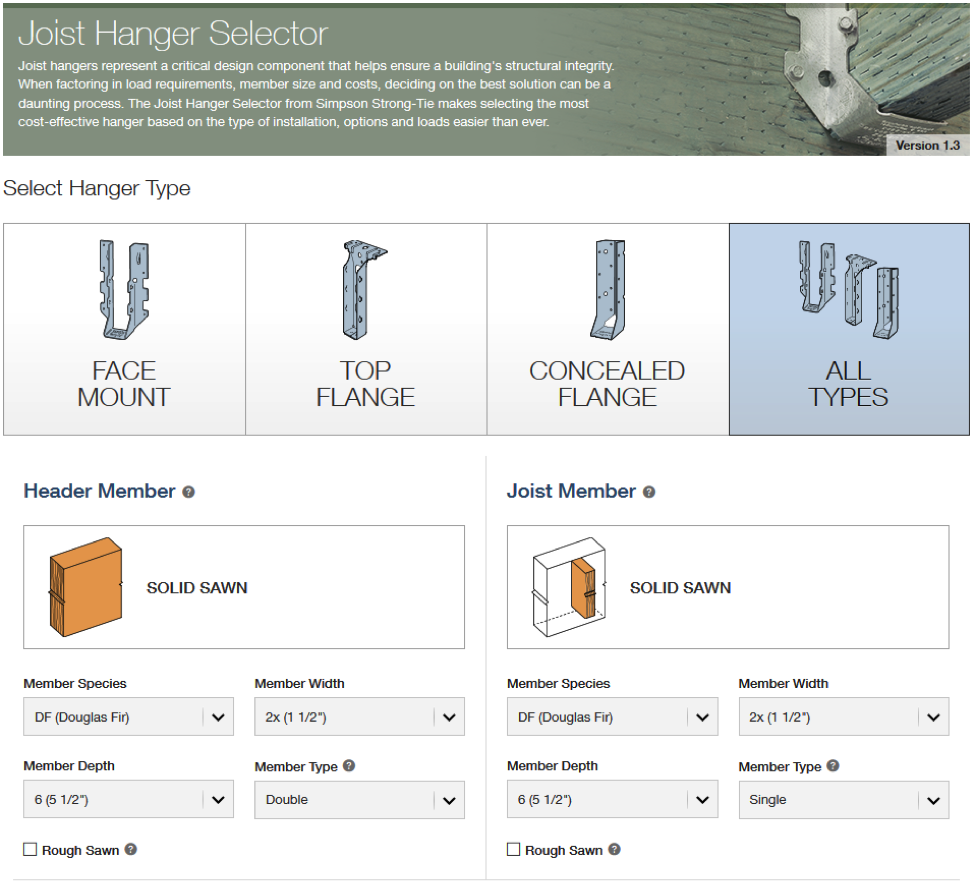
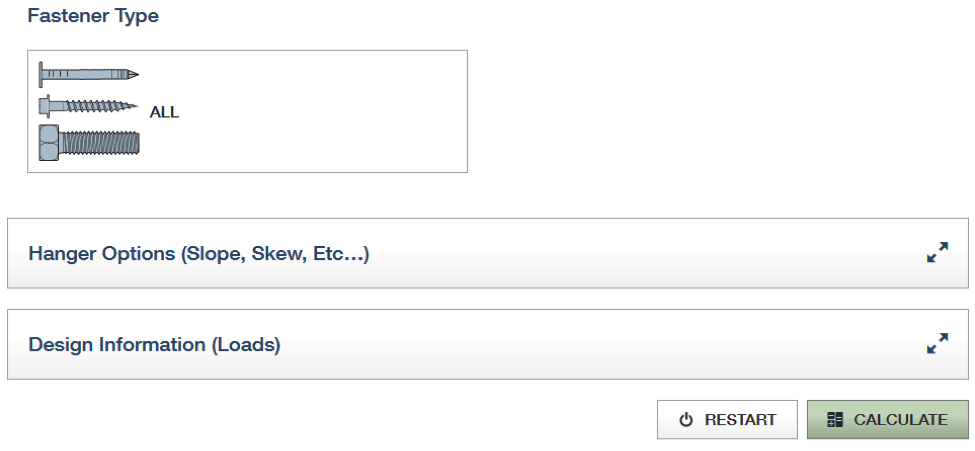
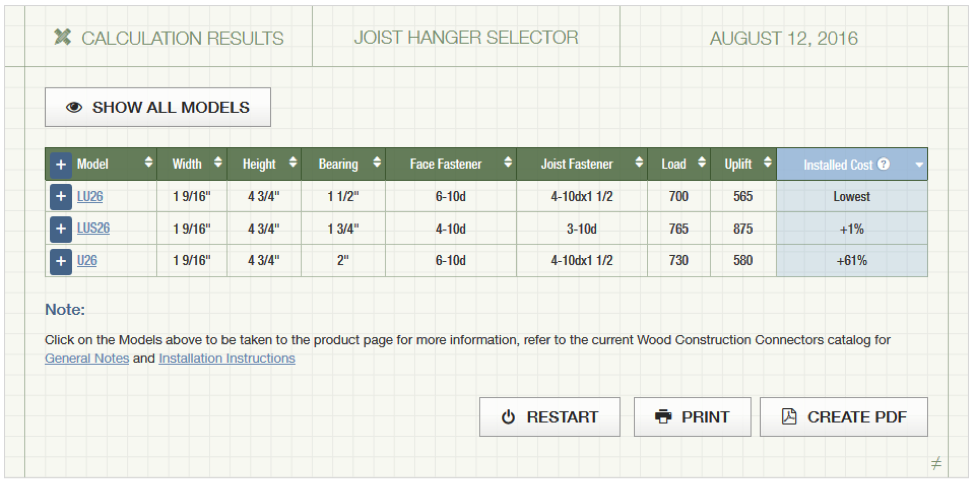
For a quick aid in choosing a connector, Simpson Strong-Tie recently developed our Joist Hanger Selector Web App. This is found directly on the strongtie.com website. While not necessarily as versatile as the Connector Selector, it has a much easier-to-use graphic interface where the user can choose any option they wish. Just simply choose the desired hanger type, the header member, the joist member, the fastener type, any hanger options and input any design load requirements, then hit calculate, and your choices show up immediately.

Here is the output shown for the same inputs as the Connector Selector above. The app will initially show only the most common models that provide a solution, but the user can click SHOW ALL MODELS for a more complete list of solutions. The user can also click on the “+” next to the model name to get additional fastener options.

A final consideration in choosing a joist hanger is the finish desired. Simpson Strong-Tie manufactures joist hangers in several different finishes: Standard G90 zinc coating, ZMax® G185 zinc coating, HDG hot-dipped galvanization after fabrication, Type 316L stainless steel and powder-coat painted. The environment where the joist hanger will be installed and the material it will be in contact with (treated wood or other corrosive materials) will both influence which finish should be chosen. Guidance for selecting finishes is found in our literature and on our website. Also remember that the finish of the fastener used needs to match the finish of the connector.

We hope you find these tools helpful the next time you need to choose a joist hanger. Are there any other tools you need to help you specify Simpson Strong-Tie connectors or anchors? Tell us below.

Simultaneous Loading on Hurricane Ties

“Structures are connections held together by members” (Hardy Cross)

I heard this quote recently during a presentation at the Midwest Wood Solutions Fair. I had to write it down for future reference because of course, all of us here at Simpson Strong-Tie are pretty passionate about connections. I figured it wouldn’t take too long before I’d find an opportunity to use it. So when I started to write this blog post about the proper selection of a truss-to-wall connection, I knew I had found my opportunity – how fitting this quote is!

There are plenty of photos of damage wrought by past hurricanes to prove that the connection between the roof and the structure is a critical detail. In a previous blog  post, I wrote about whose responsibility it is to specify a truss-to-wall connection (hint: it’s not the truss Designer’s).  This blog post is going to focus on the proper specification of a truss-to-wall connection, the methods for evaluating those connections under combined loading and a little background on those methods (i.e., the fun stuff for engineers).

hurricane1

Take a quick look at a truss design drawing, and you will see a reaction summary that specifies the downward reaction, uplift and a horizontal reaction (if applicable) at each bearing location. Some people are tempted to look only at the uplift reaction, go to a catalog or web app, and find the lowest-cost hurricane tie with a capacity that meets or barely exceeds the uplift reaction.

hurricane2

However, if uplift was the only loading that needed to be resisted by a hurricane tie, why would we publish all those F1 and F2 allowable loads in our catalog?

hurricane3

Of course, many of you know that those F1 and F2 allowable loads are used to resist the lateral loads acting on the end and side walls of the building, which are in addition to the uplift forces.  Therefore, it is not adequate to select a hurricane tie based on uplift reactions alone.

Excerpt from BCSI (2015 Version)

Where does one get the lateral loads parallel and perpendicular to the plate which must be resisted by the truss-to-wall connection? Definitely not from the truss design drawing! Unless otherwise noted, the horizontal reaction on a truss design should not be confused with a lateral reaction due to the wind acting on the walls – it is simply a horizontal reaction due to the wind load (or a drag load) being applied to the truss profile. It is also important to note that any truss-to-wall connection specified on a truss design drawing was most likely selected based on the uplift reaction alone. There may even be a note that says the connection is for “uplift only” and does not consider lateral loads. In this case, unless additional consideration is made for the lateral loads, the use of that connector alone would be inadequate.

Say, for example, that the uplift and lateral/shear load requirements for a truss-to-wall connection are as follows:

Uplift = 795 lb.

Shear (parallel-to-wall) = 185 lb.  (F1)

Lateral (perp-to-wall) = 135 lb.  (F2)
Based on those demand loads, will an H10A work?

hurricane5

An initial look at the H10A’s allowable loads suggests it might be adequate. However, when these loads are entered into the Connector-Selector, no H10A solution is found.

Combined Uplift, F1 and F2 Loads

Why? Because Connector-Selector is evaluating the connector for simultaneous loading in more than one direction using a traditional linear interaction equation approach as specified in our catalog:

hurricane7

If the shear and lateral forces were to be resisted by another means, such that the H10A only had to resist the 795 lb. of uplift, then it would be an adequate connector for the job. For example, the F1 load might be resisted with blocking and RBC clips, and the F2 loads might be resisted with toe-nails that are used to attach the truss to the wall prior to the installation of the H10A connectors. However, if all three loads need to be resisted by the same connector, then the H10A is not adequate according to the linear interaction equation.

Uplift Only
Uplift Only

Some might question how valid this method of evaluation is – Is it necessary? Is it adequate? How do we know? And that is where the interesting information comes in. Several years ago, Simpson Strong-Tie partnered with Clemson University on an experimental study with the following primary objectives:

1. To verify the perceived notion that the capacity of the connector is reduced when loaded in more than one direction and that the linear interaction equation is conservative in acknowledging this combined load effect.

2. To propose an alternative, more efficient method if possible.

Three types of metal connectors were selected for this study – the H2.5A, H10, and the META20 strap – based on their different characteristics and ability to represent general classes of connectors. The connectors were subjected to uni-axial, bi-axial and tri-axial loads and the normalized capacities of the connectors were plotted along with different interaction/design surfaces.

These interaction plots were used to visualize and parameterize the combined load effect on the capacity of the connectors. The three different interaction plots that were examined were the traditional linear relationship, a quadratic interaction surface and a cuboid design space.

Tri-axial Test Frame
Interaction plot for tri-axial loads on a cuboid design space

The results?  Not only was the use of the linear interaction equation justified by this study, but a new, more efficient cuboid design surface was also identified. It provides twice the usable design space of the surface currently used for tri-axial loading and still provides for a safe design (and for the bi-axial case, it is even more conservative than the linear equation). This alternative method is given in our catalog as follows:

hurricane11

Now we can go back to the H10A and re-evaluate it using this alternative method:

hurricane12

As it turns out, the H10A does have adequate capacity to resist the simultaneous uplift, shear and lateral loads in this example. This just goes to show that the alternative method is definitely worth utilizing, whenever possible, especially when a connector fails the linear equation.

For more information about the study, see Evaluation of Three Typical Roof Framing-to-Top Plate/Concrete Simpson Strong-Tie Metal Connectors under Combined Loading.

What is your preferred method for resisting the combined shear, lateral and uplift forces acting on the truss-to-wall connections? Let us know in the comments below!

Introducing the Joist Hanger Selector Web App

Designing buildings and dealing with construction has always been a satisfying career for me. It is challenging to design a complete structural system, coordinate with the other consultants and create a clear set of construction documents for the contractor. Throughout my career, I’ve occasionally had a few panicked “Uh oh!” moments. I hope I’m not alone in admitting those happen. These typically occur far away from work when something prompts me to think about a project. I might see concrete being placed, then question whether I remembered to change the reinforcing callout on a mat slab I had just designed. I can’t stop thinking about it until I get back in the office to check.

I had an “Uh oh!” moment a few days after I started work at Simpson Strong-Tie. We have a training plan I call Catalog 101 where new engineers meet with each engineer who is an expert for a given product line. After I had met with our experts on holdowns, concrete anchors and engineered wood products, it was on to top-flange hangers (and my “Uh oh!” moment).

Catalog 101
We really do call it Catalog 101

After learning a lot of things I didn’t know about hangers, we moved on to available options for some of our top-flange hangers – sloped, skewed, sloped and skewed, sloped top-flange, and offset top-flange. I learned that some hanger options get full load, some have small reductions and others large reductions. For example, the GLT with an offset top-flange gets 50% of the table load.

GLT/HGLT hanger options section of Wood Construction Connectors Catalog, C-2013

“Uh oh!”

I had recently designed a project and specified a bunch of GLT hangers with offset top-flanges. I hadn’t noticed there was a reduction for this modification; I just thought it was really cool that Simpson Strong-Tie had a hanger that worked at the end of a beam. Minor panic set in until I could check my calculations. Fortunately, the beams at the framing conditions that required offset hangers had half the load of the typical beams, so the hanger was okay even with the load reduction.

Hanger Option Matrix from Wood Construction Connectors Catalog, C-2013

The Wood Construction Connectors Catalog has a Hanger Options Matrix that makes it relatively simple to see which options – sloped, skewed, concealed, welded – are available for each hanger. The pages following the options matrix have more detailed information about size restrictions and load reductions associated with each option. It can be somewhat tedious to sift through all of the options and apply the reduction factors, so I always recommend using the Simpson Strong-Tie Connector Selector® software to do the work for you.

Connector Selector
Connector Selector

Connector Selector software allows you to input you geometry and loads and returns a list of connectors that meet those requirements, including any reductions due to modifications. Connector Selector is a desktop application, which needs to be downloaded and installed on your PC. Engineers have indicated they like the functionality of Connector Selector, but wished the input was more intuitive and preferred it as a web application.

Joist Hanger Selector web app

I’m happy to say we listen, and the new Simpson Strong-Tie Joist Hanger Selector web app is available now. The easy-to-use interface enables users to quickly select the connection details and print out results. You can access the app from any web browser without having to download or install special software. The allowable loads are automatically calculated to reflect reductions associated with modifications – no more “Uh oh!” moments for me (at least with hangers).

Joist Hanger Selector App
The joist hanger selector app makes it easy to pick the right hanger.

Give the new Joist Hanger Selector web app a try and let us know what you think. We always appreciate your feedback!