Simpson Strong-Tie® SET-3G™ Adhesive Offers a Ductile Solution for Post-Installed Anchorage near a Concrete Edge

Designing post-installed anchorage near a concrete edge is challenging, especially since the ACI provisions for cracked-concrete anchorage went into effect. In the following post, one of our field engineers, Jason Oakley, P.E., explains how SET-3G™ and Anchor Designer™ software from Simpson Strong-Tie make it easier to design a ductile anchor solution.

Engineers often provide holdown anchoring solutions near a concrete edge to help prevent overturning of light-frame shear walls during a seismic (or high-wind) event. Sometimes a post-installed anchor must be used if the cast-in-place anchor was mislocated or misinstalled, or is located where a retrofit or addition is needed. Since the cracked-concrete anchorage design provisions went into effect more than a decade ago, it has been challenging for engineers to offer a near-edge post-installed anchoring solution. This is especially true for structures subject to earthquake loads in seismic design category (SDC) C through F. Simpson Strong-Tie’s new SET-3G epoxy is the first anchoring adhesive in the industry to offer exceptionally high bond-strength values that permit ductile anchorage in concrete near an edge. This blog post will cover a specific example that focuses on Chapter 17 of ACI 318-14 to design a threaded rod, anchored with SET-3G adhesive, used to secure a holdown located 1 3/4″ away from a single concrete edge (Figure 1).
Continue Reading

Holdown Anchorage Solutions

A couple years ago, I did a post on selecting holdown anchorage solutions. At the time, we had created a couple engineering letters that tabulated SSTB, SB and PAB anchor solutions for each holdown to simplify specifying anchor bolts. About a year later, a salesperson suggested we tabulate SSTB, SB and PAB anchor solutions for each holdown. You know, to simplify specifying anchor bolts…

This conversation reminded me of the difficulty in keeping track of where design information is. In the C-C-2017 Wood Construction Connectors catalog, we have added this material on pages 62-63. Which should make it easier to find. I thought I should update this blog post to correct the links to this information.

A common question we get from specifiers is “What anchor do I use with each holdown?” Prior to the adoption of ACI 318 Appendix D (now Chapter 17 – Anchoring to Concrete), this was somewhat simple to do. We had a very small table in the holdown section of our catalog that listed which SSTB anchor worked with each holdown.
Continue Reading

How to Select a Connector Series – Holdowns

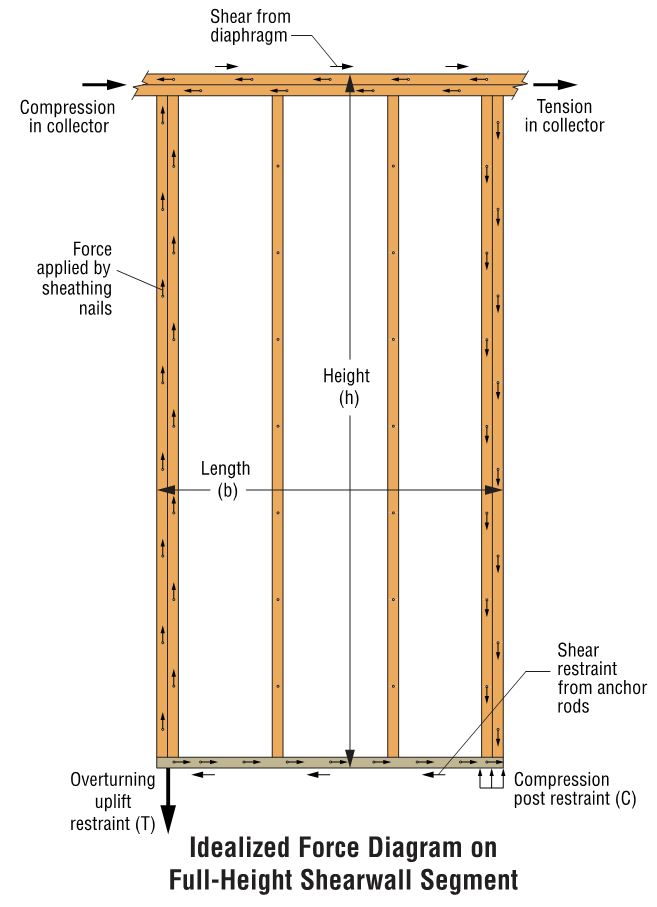
Keith Cullum started off our “How to Select a Connector” series with Hurricane Ties. This week we will discuss how to select holdowns and tension ties, which are key components in a continuous load path. They are used to resist uplift due to shearwall overturning or wind uplift forces in light-frame construction. In panelized roof construction, holdowns are used to anchor concrete or masonry walls to the roof framing.

shearwall-segment

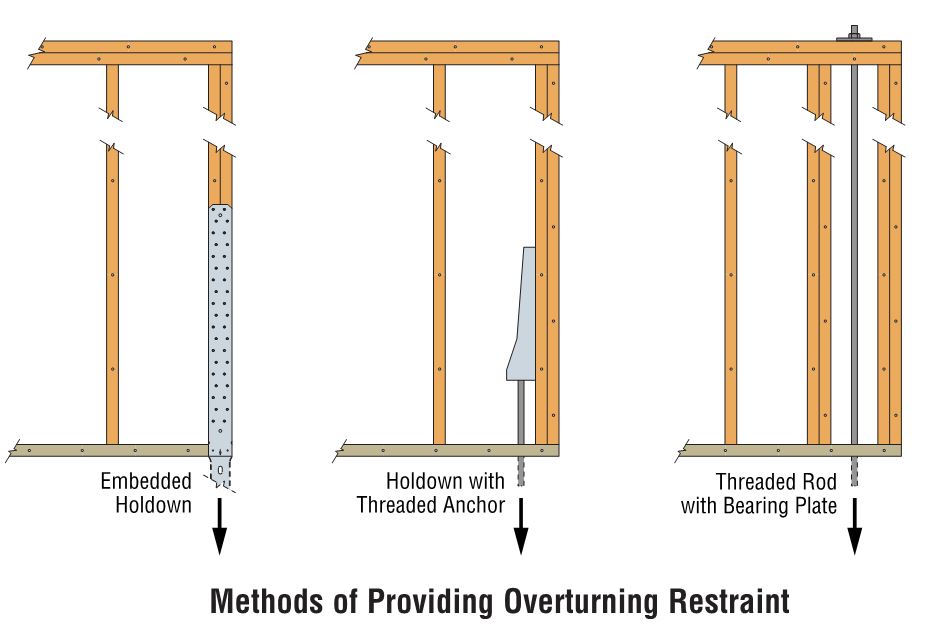
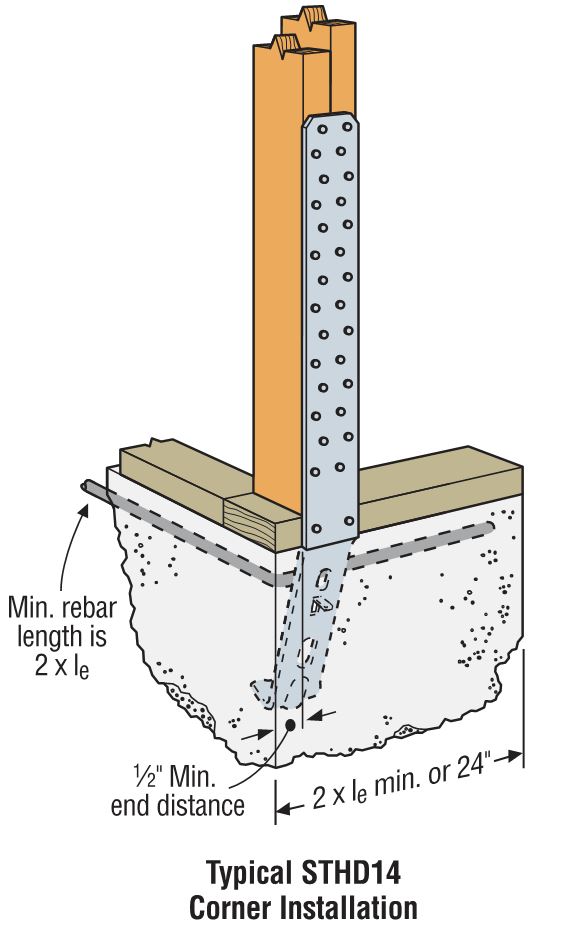
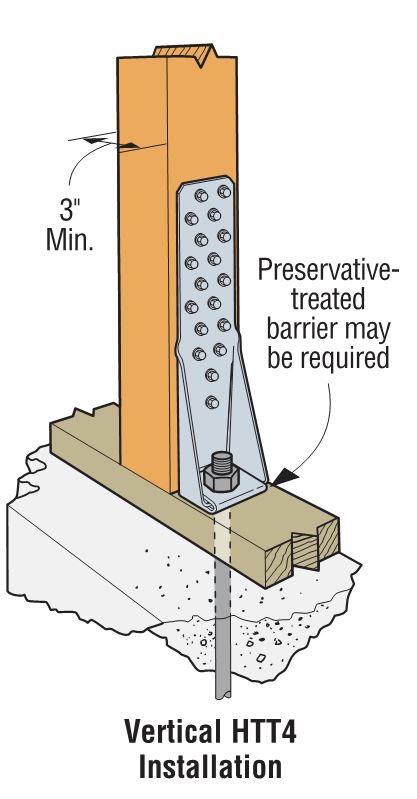
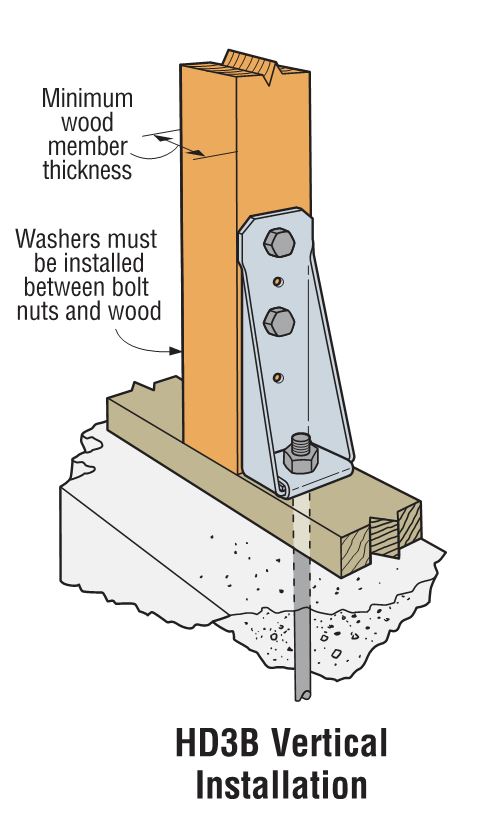
Holdowns can be separated in two basic categories – post-installed and cast-in-place. Cast-in-place holdowns like the STHD holdowns or PA purlin anchors are straps that are installed at the time of concrete placement. They are attached with nails to wood framing or with screws to CFS framing. After the concrete has been placed, post-installed holdowns are attached to anchor bolts at the time of wall framing. The attachment to wood framing depends on the type of holdowns selected, with different models using nails, Simpson Strong-Tie® Strong-Drive® SDS Heavy-Duty Connector screws or bolts.

A third type of overturning restraint is our anchor tiedown system (ATS), which is common in multistory construction with large uplift forces. I discussed the system in this blog post.

methods-of-overturning-restraintGiven the variety of different holdown types, a common question is, how do you choose one?

For prescriptive designs, such as the IRC portal frame method, the IRC or IBC may require a cast-in-place strap-style holdown. Randy Shackelford did a great write-up on the PFH method in this post.

For engineered designs, a review of the design loads may eliminate some options and help narrow down the selection.

Holdown TypeMaximum Load (lb.)
Cast-in-Place5,300
Nailed5,090
SDS Screws14,445
Bolted19,070

sthd-installation

htt-installation

hdb-installation

hdu-installation

I like flipping through catalog pages, but our Holdown Selector App is another great tool for selecting a holdown to meet your demand loads. Select cast-in-place or post-installed, enter your demand load and wood species, and the application will list the holdown solutions that work for your application.

holdown-selector-app

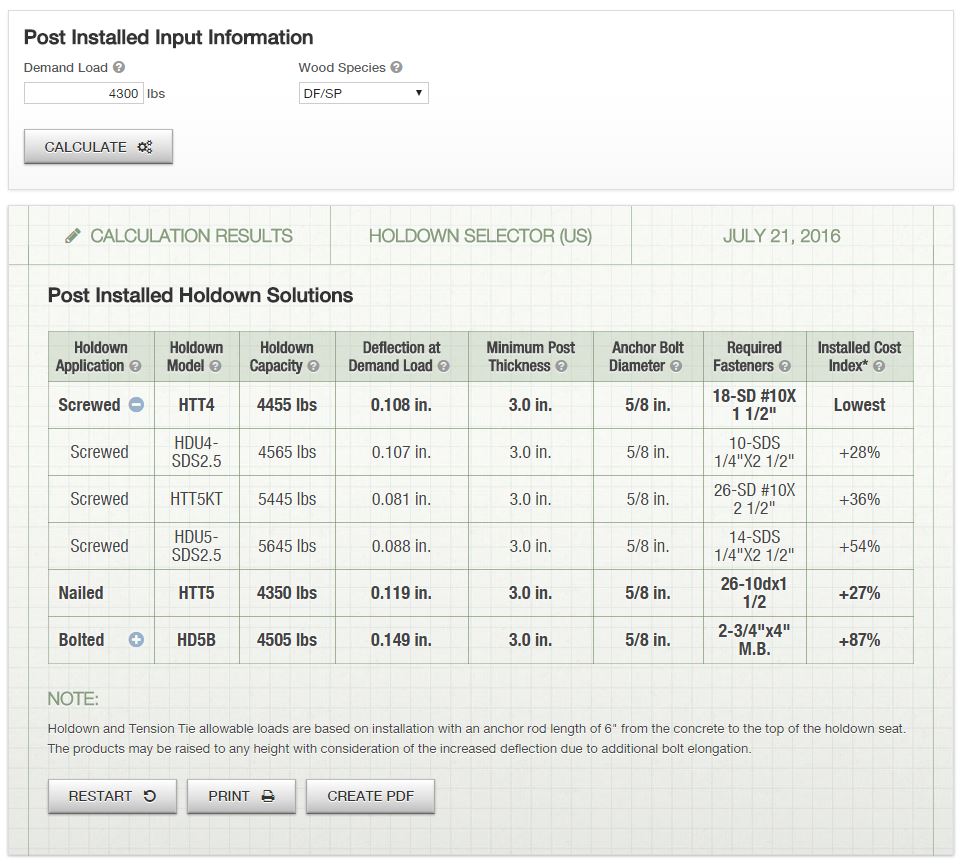
The application lists screwed, nailed and bolted solutions that meet the demand load in order of lowest installed cost, allowing the user to select the least expensive option.

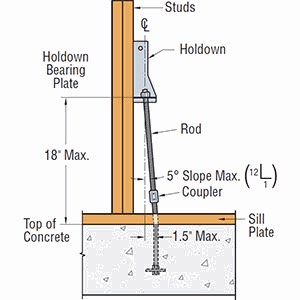
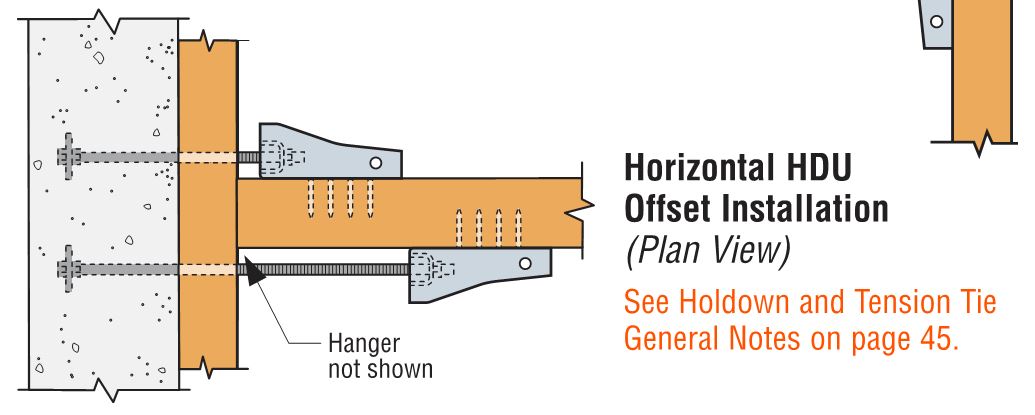
Adjustability should be considered when choosing between a cast-in-place and a post-installed holdown. Embedded strap holdowns are economical uplift solutions, but they must be located accurately to align with the wood framing. If the anchor bolt is located incorrectly for a post-installed holdown, raising the holdown up the post can solve many problems. And anchors can be epoxied in place for missing anchor bolts.

offset-holdown-raised-off-sill
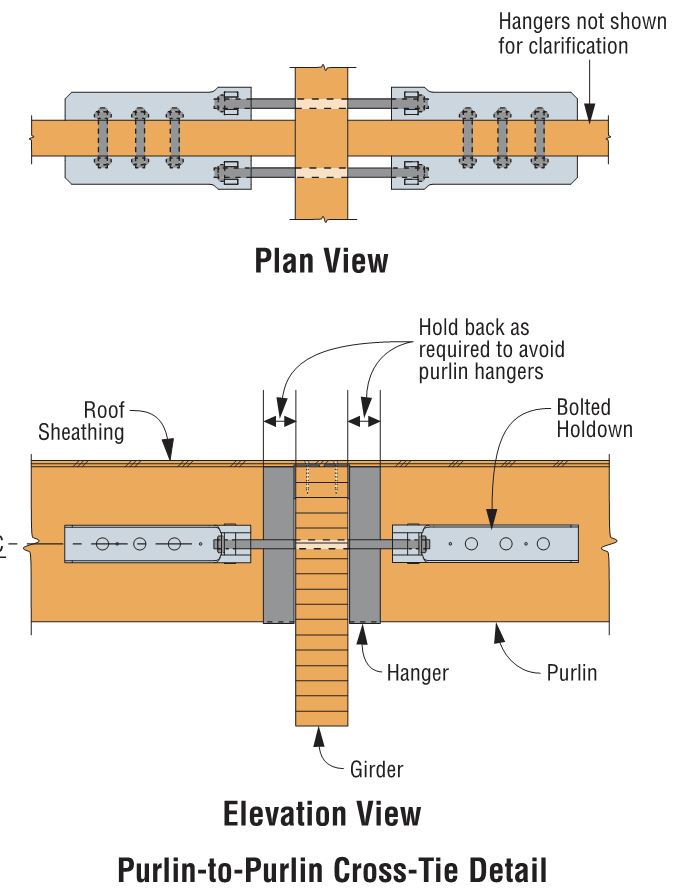
We are often asked if you can double the load if you install holdowns on both sides of the post or beam. The answer is yes, and this is addressed in our holdown general notes.

notes-on-doubling-loads

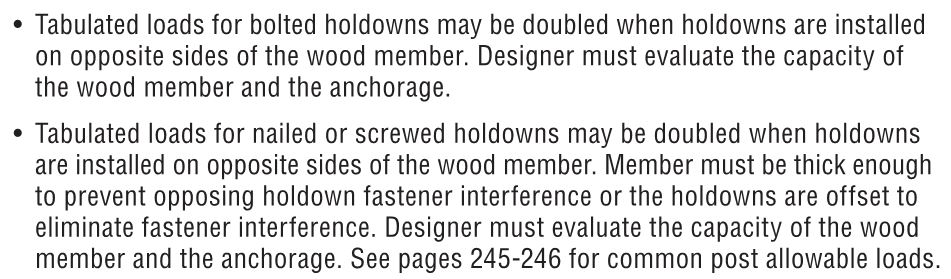
Nailed or screwed holdowns need to be installed such that the fasteners do not interfere with each other. Bolted holdowns do not need to be offset for double-sided applications. Regardless of fastener type, the capacity of the anchorage and the post or beam must be evaluated for the design load.

double-sided-bolted-purlin-cross-tie

double-sided-hdu-offset-installation

Once you have selected a holdown for your design, it is critical to select the correct anchor for the demand loads. Luckily, I wrote a blog about Holdown Anchorage Solutions last year. What connector would you like to see covered next in our series? Let us know in the comments below.

Simpson Strong-Tie® Strong-Wall® Wood Shearwall – The Latest in Our Prefabricated Shearwall Panel Line Part 2

In last week’s blog post, we introduced the Simpson Strong-Tie® Strong-Wall® Wood Shearwall. Let’s now take a step back and understand how we evaluate a prefabricated shear panel to begin with.

First, we start with the International Building Code (IBC) or applicable state or regional building code. We would be directed to ASCE7 to determine wind and seismic design requirements as applicable. In particular, this would entail determination of the seismic design coefficients, including the response modification factor, R, overstrength factor, Ωo, and deflection amplification factor, Cd, for the applicable seismic-force-resisting system. Then back to the IBC for the applicable building material: Chapter 23 covers Wood. Here, we would be referred to AWC’s Special Design Provisions for Wind and Seismic (SDPWS) if we’re designing a lateral-force-resisting system to resist wind and seismic forces using traditional site-built methods.Continue Reading

Simpson Strong-Tie® Strong-Wall® Wood Shearwall – The Latest in Our Prefabricated Shearwall Panel Line Part 1

Some contractors and framers have large hands, which can pose a challenge for them when they’re trying to install the holdown nuts used to attach our Strong-Wall® SB (SWSB) Shearwall product to the foundation. Couple that challenge with the fact that anchorage attachment can only be achieved from the edges of the SWSB panel, and variable site-built framing conditions can limit access depending upon the installation sequence. To alleviate anchorage accessibility issues, we’ve required a gap between the existing adjacent framing and SWSB panel equal to the width of a 2x stud to provide access so the holdown nut can be tightened. Even so, try telling a framer an inch and a half is plenty of room in which to install the nut!Continue Reading