

Over the next few months, I will be doing a short three-part series going over common technical inquiries we receive in the engineering department. There is a wealth of information available on our website and in our literature, but so much content can sometimes be difficult to navigate. It is often said that knowledge is power, so my hope is to empower you with all the technical support you need so you can complete your job quickly and efficiently.
In this first article, I will be going over four commonly asked questions related to anchor products. The most common question we get is this:
“How soon after initial concrete pour can one use an adhesive anchor?”
Per the Anchoring, Fastening, Restoration and Strengthening Systems for Concrete and Masonry Catalog (C-A-2023) on page 238, our design information values are based on concrete that is at least 21 days old. Typically, we get this question from projects where the concrete has recently been poured and customers are eager to get the project moving. For installations into concrete cured less than 21 days, we would refer customers to the following modification table with the listed adhesive bond strength factors.
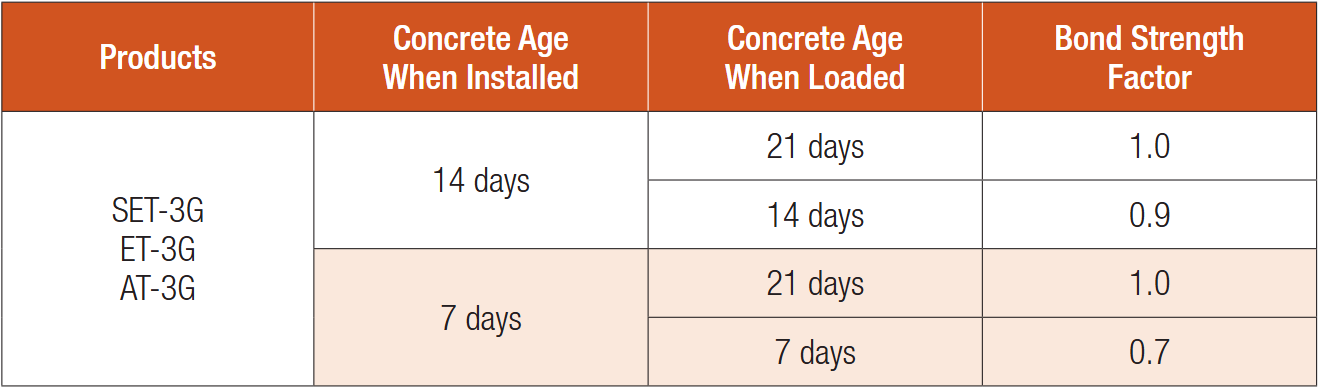
Please note that we do not recommend installation into green concrete less than seven days after initial pour and that this table only applies to epoxy anchors. Per note ‘I’ on page 18 of C-A-2023, mechanical anchors should also not be installed into concrete that is less than seven days old. Allowable loads and design strengths of mechanical anchors that are installed into concrete less than 28 days old should be based on the compressive strength of the concrete at the time of installation.
The second most common anchor product question we receive is:
“What is the acceptable hole size for post-installed anchors?”
This question is asked about both adhesive and mechanical anchors, though it is more often asked of adhesive applications, and that answer is a little more involved. So, I will start with the easy one, which is the mechanical anchors. Drill bit sizes for mechanical anchors are the same as the nominal diameter of the anchor that is being specified. For example, if you are installing a THD50500H (Titen HD® ½” x 5″), you would simply use a ½”-diameter drill bit. The length would be determined by the nominal depth called out by the engineer of record. This rule applies to both Titen HD and expansion anchors.
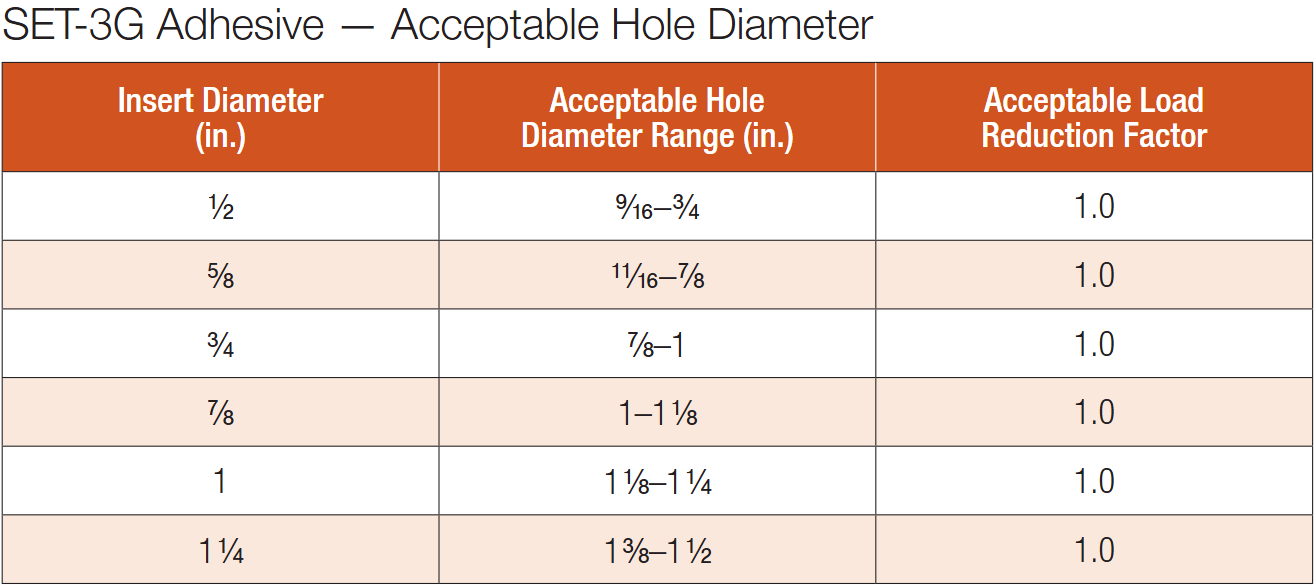
For adhesive anchors, acceptable hole diameters vary depending on adhesive type, but most customers are surprised as to what the oversized hole tolerances are. There are two locations where you can find this information. First, there is the Supplemental Topics for Anchors section on page 238 of the Anchoring, Fastening, Restoration and Strengthening Systems for Concrete and Masonry Catalog (C-A-2023). Each type of adhesive has its own table showing the acceptable hole diameter range without having to take a load reduction. I have included the SET-3G™ chart as an example.
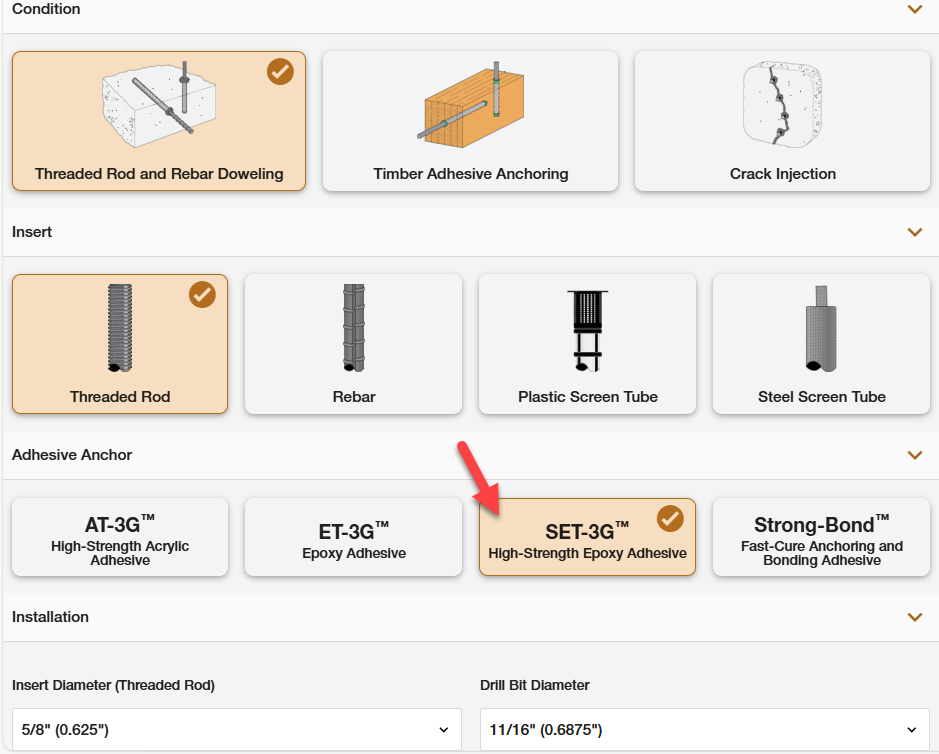
The second option would be to use the ACE Adhesive Cartridge Estimator application on our website. This app is free to use and especially useful in not only determining the acceptable hole sizes but also in providing you with an approximation as to how much adhesive you will need for your project. To use this, you simply select your condition, then insert anchor type and diameter.
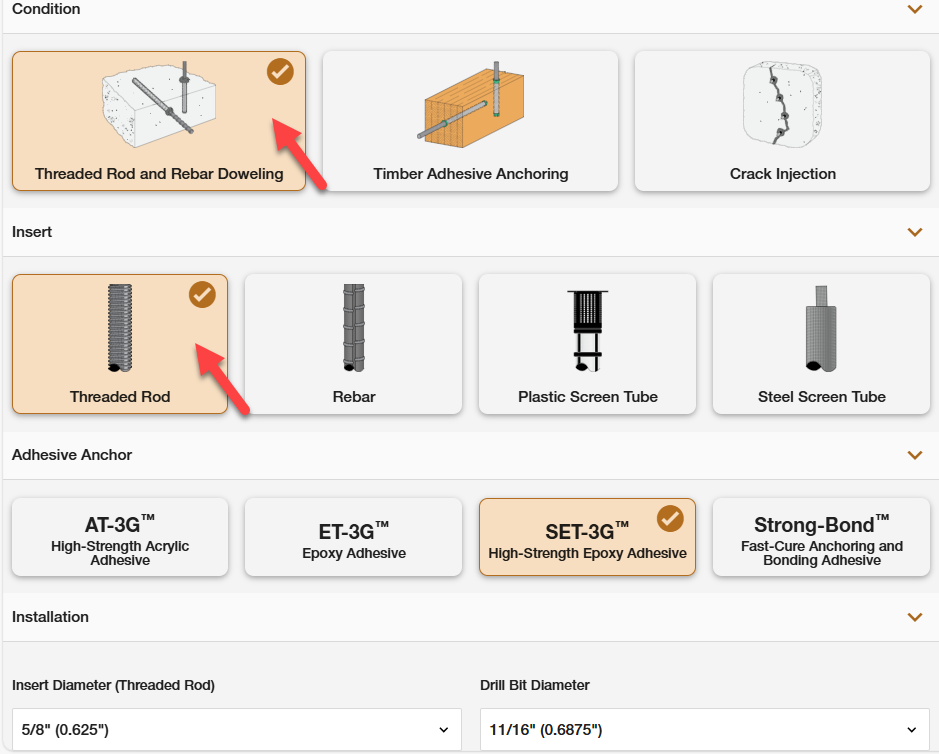
You then select your adhesive, and in the installation portion you can select the drop-down menu for drill bit diameter sizes. In this example for SET-3G, I have selected a 5/8″-diameter anchor, and you will notice that the acceptable diameter of the drilled hole ranges anywhere from 11/16″ to 7/8“ with no load reduction.

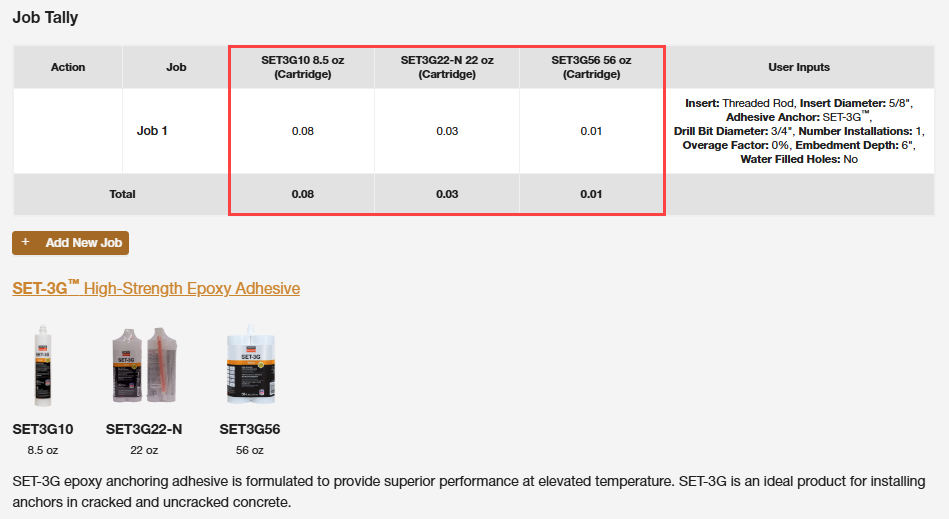
If you enter additional information in the app like embedment depth and number of installations, the output screen will show you the approximate number of cartridges required.
The third most common anchor product question we receive is:
“What is the minimum/maximum installation torque for anchors?”
Customers typically ask us what the minimum/maximum installation torque is for Titen HD anchors, though the question does come up for epoxy anchors from time to time as well. I believe part of the reason we get this question so often is that there is some confusion as to torque requirements for post-installed anchors. The only Simpson Strong-Tie mechanical anchors requiring to be torqued are the Strong-Bolt® 2 and Wedge-All® wedge-style expansion anchors. Torquing expansion anchors is critical to assure proper installation. One of the benefits to the Titen HD anchors is that they do not require torquing but are simply installed with the underside of the washer head flush to the material being anchored down. If the designer or inspector requires an installation torque, we do publish a maximum installation torque for the Titen HD anchor in our literature. This information is provided so that the anchor is not overtightened and preloaded, which would be detrimental to its design. Over torquing the Titen HD would add additional stress to substrate material, causing the connection to fail at a much lower load than the designer intended. This information can be found in the Titen HD code report and anchor catalog homepage.
Customers often ask about the minimum or maximum installation torque required for Titen HD screw anchors. Sometimes they ask about required torque for adhesive anchors. The simple answer to these questions is, “Only the expansion anchors require a minimum torque, per the catalog tables. For adhesive anchors with threaded rod, the nut is finger tight plus 1/2 turn with a wrench. Titen HD screw anchors are simply installed with the head in contact with the fixture…no additional torque.”
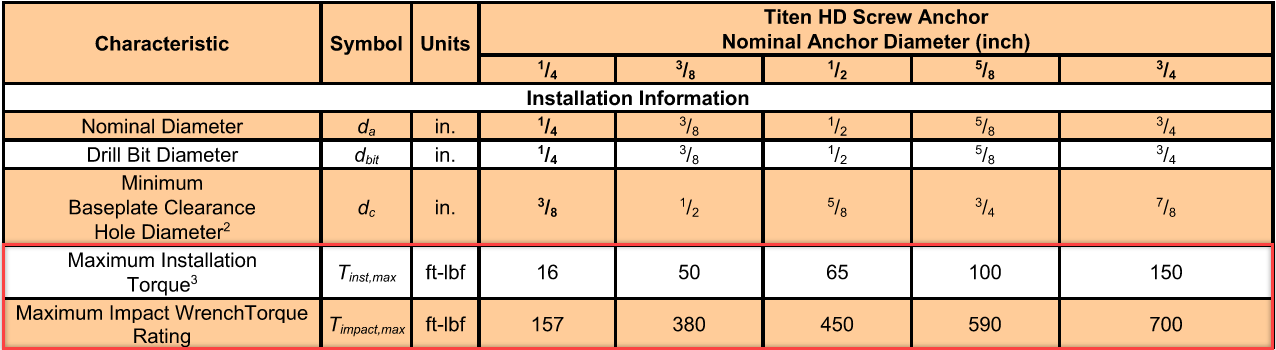
Note that this also applies to adhesive anchors, as they are not required to be torqued down. The relevant maximum installation torque ratings are provided in the products’ catalog pages and code reports.
The fourth common anchor question we receive is:
“Can I remove or reuse a Titen HD anchor?”
Per installation section 4.3 of ESR-2713, you are allowed to loosen the Titen HD no more than one turn and then reinstall. This will still be within tolerance and no-load reduction is required. Unfortunately, the anchor cannot be removed and reused, nor can you reuse the same hole.
If for some reason your application requires complete removal of the Titen HD and you still want to use the same hole, you could consider one of the following options.
- First, let us assume a 1/2“-diameter Titen HD was originally specified. If your application allows it, you can oversize the hole and reinstall with a 5/8“-diameter Titen HD per our installation instructions.
- If the first option is not possible and you require a shallower embedment, your second option would be to consider using the same hole with a 3/8“ threaded rod and SET-3G if the values meet the design load requirements; or drill a larger-diameter hole and upsize the rod.
I hope you find this information useful and beneficial. The information in this blog is current as of today when I am writing it, but as a company that is constantly improving, always stay tuned for updates and never hesitate to call us for the latest information.
For part II of this series, I will be covering common connector product inquiries we receive. Please stay tuned for that.
