


What do you do when brickwork is in bad condition? Depending on what state the brickwork is in, a tear-down may be called for. However, often brickwork can be restored and strengthened using helical ties such as Simpson Strong-Tie® Heli-Tie™ wall ties and stitching ties. This post introduces these two types of helical ties, which might be just what you need for your next brick restoration project.
What is a helical tie?
A helical tie is made by twisting a metal profile into the shape of a helix. The design of the Simpson Strong-Tie Heli-Tie wall tie also incorporates a large core diameter in order to provide higher torsional capacity. The benefit of this feature is less axial deflection due to a propensity for normal helix shape to “uncoil” under tension load. Since helical ties are typically used in building façades, they are generally made from stainless steel in order provide the necessary corrosion resistance. Helical ties can be used to retrofit and stabilize brickwork in two common applications: 1) Wall anchor applications, and 2) Stitching tie applications.

What are common helical wall tie applications?
Application #1: Anchoring building façades to structural members
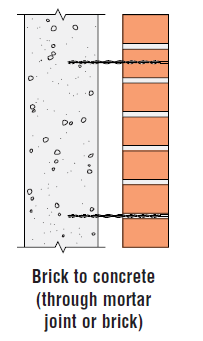
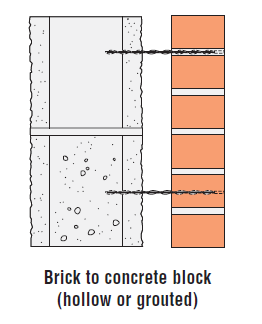
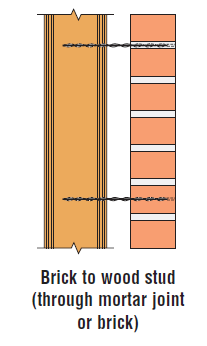
In a wall anchor application, the helical tie is used to stabilize the façade by transferring out of plane façade forces through the anchor into the backup material. The need for this type of reinforcement arises when pre-existing wall anchors were never installed, were inadequately spaced or have corroded away over time. Helical ties are an economical solution that can be installed directly through a brick façade into various backup materials such as solid concrete, CMU block, and even wood or metal studs.
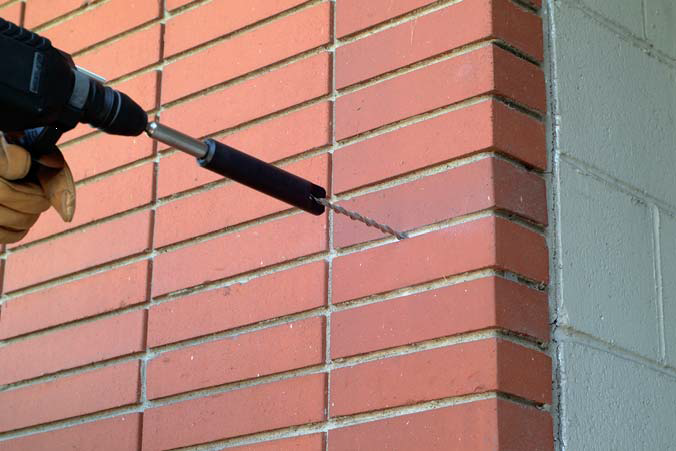
A pilot hole is drilled through the existing brick wall and any air gap into the backup material. Then the helical tie is placed in an installation tool and driven into the pre-drilled hole. As it is driven, the fins of the helical tie tap into both the masonry and backup material and provide an expansion-free connection that will withstand tension and compression loads. Some helical wall ties, like the Heli-Tie, use an installation tool that countersinks the tie below the surface of the brickwork. This allows the hole to be patched and concealed with a color matching material. Thereby, helical anchors allow the repair to be both efficient and inconspicuous when completed.
There are presently no specific U.S. design standards for the use and qualification of helical wall ties. However, a rational calculation of required spacing given the demand load can be easily calculated using TMS 402/602 (Building Code Requirements and Specifications for Masonry Structures) and test data with an appropriate factor of safety. In addition, many Designers also follow the detailing practice for prescriptive anchored veneer in Section 13.2.
Prescriptive anchors also require bed joints to be at least twice the thickness of the embedded anchor. However, this provision is not relevant for helical anchors since they are installed into a drilled hole, rather than embedded into a wet mortar joint.
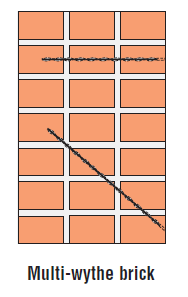
Application #2: Stabilizing multiple-wythe brick walls
In this application, the wall tie is used to attach wythes of brick to one another in an effort to stabilize the wall. By intermittently alternating installation angles (0 o, 45 o, 0o, -45 o, etc.) the tie promotes more monolithic behavior of the wall.
What are common helical stitching tie applications?
Unlike wall anchor applications, in a stitching tie application the helical tie is used to stabilize brickwork by transferring in- and out-of-plane shear and bending forces across an existing crack. Stitching ties are placed in the plane of the wall within the horizontal bed joint.
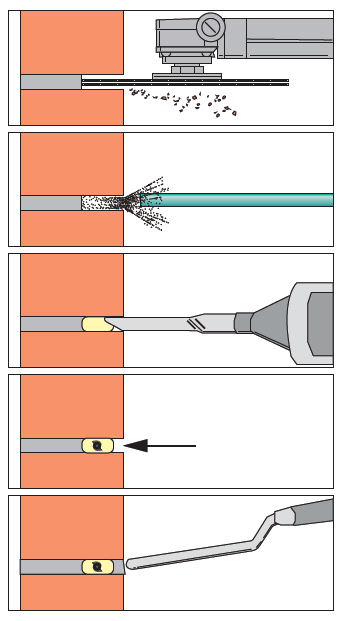
The existing bed joint is routed out deep enough to recess the helical tie and cleaned out. Then, the recess is filled about 2/3 deep with a repair mortar. The helical stitching tie is then pressed into the mortar, followed by a trowelling with encapsulating grout. The installation provides an inconspicuous repair and preserves the appearance of the structure.
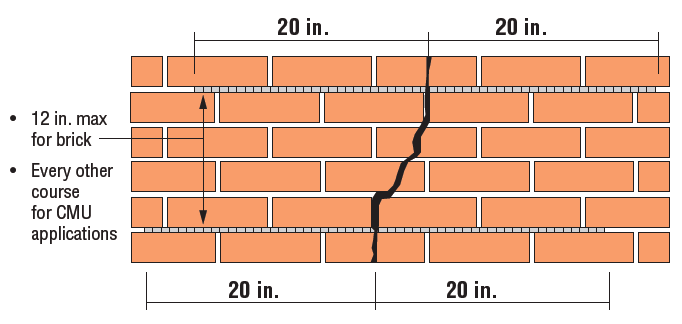
For red brick, we recommend placing stitching ties at a minimum vertical spacing of 12″ and extending the ties at least 20″ on either side of the crack.
Helical ties are not something that you see on every jobsite, however, they can provide a fast and cost-effective solution for brickwork rehabilitation. Hopefully this post provided you some background about them and an insight into our Heli-Tie product offering. The recent launch of our Repair Protection Strengthening Systems product line complements the Heli-Tie with a wide array of other repair products.
Do you have any past experience with helical wall ties, or questions? Please share in the comments below.
Explore Heli-Tie Products
Heli-Tie Helical Stitching Tie

Heli-Tie Helical Wall Tie

