Modern code-listed adhesive anchors offer high-strength connection solutions for a variety of applications. However, as in all construction projects, good product performance requires proper selection and installation. In this blog post, we will discuss the challenge of installation orientation and an accessory that can help installers more easily make proper adhesive anchor installations—the piston plug adhesive delivery system.
ACI 318-11 Appendix D (Anchoring to Concrete) calculations use a uniform bond stress model to calculate an adhesive anchor’s resistance to bond failure. According to this theory, an adhesive anchor is assumed to transfer applied loads into the concrete base material uniformly along its effective embedment depth, hef. The equation for an anchor’s basic bond strength (expressed in pounds of force) is simply the adhesive formulation’s bond strength per unit area (λ * τcr) multiplied by the idealized cylindrical surface area of the insert that is in contact with the adhesive (π * da * hef):
Nba = λ τcr π da hef (ACI 318-11, Eq. D-22)
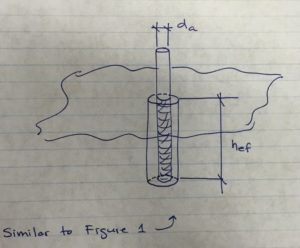 Although the model is a simplification of reality, the mathematical expression represents the core assumption that the adhesive is able to transfer stress completely along the entire depth of the anchorage. This is a key requirement in installation: Anchoring adhesives must be installed such that air entrapment and significant voids are prevented.
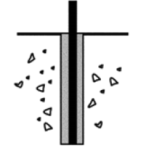
Downward installations (Figure 1) have historically presented relatively few challenges for adhesive injection in this regard. In such applications, gravity is helpful; the adhesive naturally flows to the bottom of the drilled hole while being dispensed from the cartridge through a static mixing nozzle. The installer maintains the open end of the nozzle below the free surface of the adhesive until the drilled hole is filled to the desired level. For deep holes, extension tubing is affixed to the open end of the nozzle to increase reach. This procedure avoids entrapping air bubbles in the adhesive material.
Installations into horizontal, upwardly inclined or overhead drilled holes (Figure 2) require more care on the part of adhesive anchor installers. Although the installation principle to avoid entrapping air is similar for these orientations, a key difference is that gravity does not help to keep the adhesive towards the “bottom” (deepest point) of the drilled hole. At worst, it can work against the installer when ambient temperatures may cause the adhesive to run out of the hole during injection. These adhesive anchor installations can be more difficult for an untrained installer and can slow the rate of work. This is one of the reasons that ACI 318-11 Section D.9.2.4 requires continuous special inspection of adhesive anchor installations in these three orientations when the application is also intended to resist sustained loads.
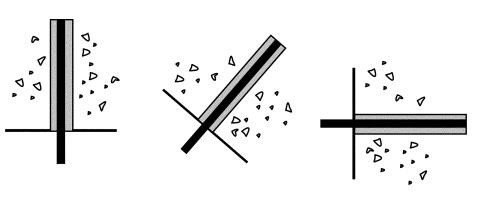
(Source: ACI 318-11, Section RD.1)
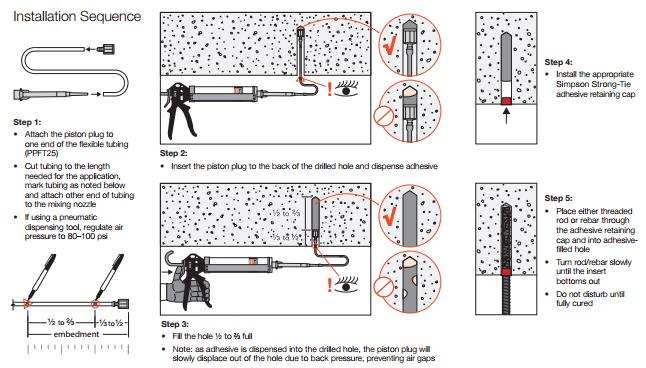
To aid the installer, Simpson Strong-Tie offers a piston plug adhesive delivery system (Figure 3). Consisting of pre-packaged flexible tubing, piston plugs and an adhesive retaining cap, this system allows installers to more easily and consistently make high-quality installations while completing their work efficiently. The installation sequence is provided in Figure 4.
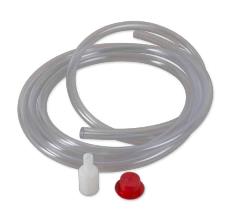
The system consists of three components:
- Piston plug – The key component of the system, it is slightly smaller in diameter than the drilled hole. As the adhesive is dispensed into the drilled hole, the piston plug is displaced out of the hole by the advancing volume of the injected adhesive. The displacement creates a more positive feel for the installer to know where the free surface of the adhesive is.
- Flexible tubing – For use with the piston plug to facilitate injection at the deepest point of the drilled hole.
- Adhesive retaining cap – Provided to prevent adhesive material from flowing out of the drilled hole after dispensing and to provide a centering mechanism for the insert. For heavy inserts in overhead conditions, other means must be provided to carry the weight of the insert and prevent it from falling or becoming dislodged from the hole before the adhesive has fully cured.
What do you think about the piston plug adhesive delivery system? Let us know by posting a comment below.

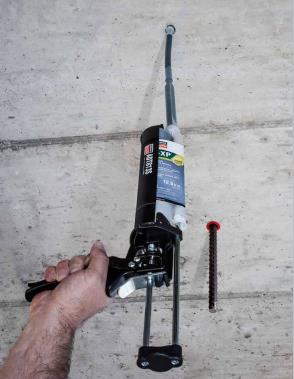

The Figure 1 caption says “Downward installation orientation” yet the image shows an overhead application. Oops?
No, Figure 1 is how ACI (and every other manufacturer) depicts Downward installation.
We have corrected the error. Thank you!
I am so happy you guys finally have a piston plug. Now if we can just get you (and one other manufacturer) to drop Retaining Caps, maybe the ACI/CRSI Adhesive Anchor Installer class’ pass rate will start to rise. The Piston Plug is orders of magnitude easier to install than the Retaining Cap and I’m extremely happy you have added it to your catelog. Well done!