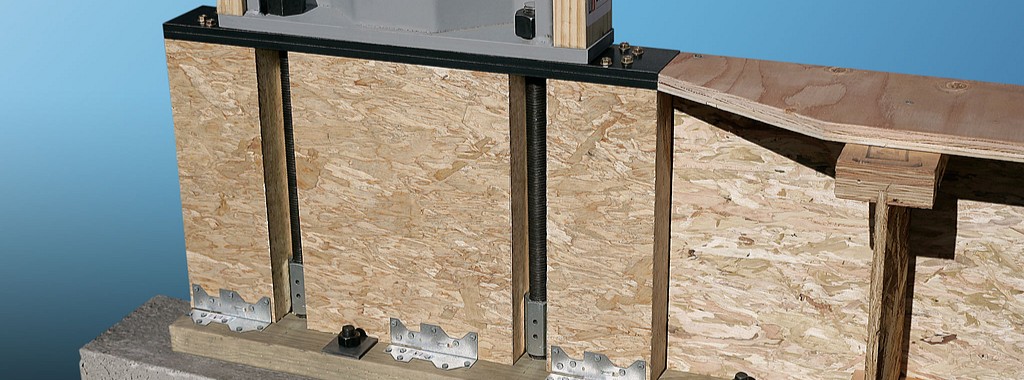
Within the world of multifamily construction, manufacturers design and detail the multistory continuous threaded rod holdowns used as shearwall overturning restraints. The Strong-Rod® anchor tiedown system (ATS) is Simpson Strong-Tie’s solution for the industry and has been the subject of many SE Blog topics in the past.
Author: Tim Kaucher
FAQs Regarding Strong-Rod Anchor Tiedown Systems (ATS) for Shearwall Overturning
How would a six-story light-frame wood building perform in a large earthquake? Back in 2009, Simpson Strong-Tie was a partner in the World’s Largest Earthquake Test, a collaboration of the NEESWood project, to answer that question. This was a full-scale test which subjected the building to 180% of the Northridge earthquake ground motions (approximately a M7.5). Within the building, Simpson Strong-Tie connectors and Strong-Frame SMF were used, with the Strong-Rod™ anchor tiedown system (ATS) serving as holdown for each shearwall.
The NEESWood building was designed under Performance-Based Design methodology, and the test was conducted as validation for the approach. Buildings of similar size to the NEESWood building are built to current codes using similar products. Mid-rise light-frame wood structures continue to be a popular form of construction in various densely populated cities across the country. As part of the lateral-force-resisting system, continuous rod systems are used as the holdown for the shearwall overturning restraints. Simpson Strong-Tie has been involved with continuous rod systems since the early 2000s when we launched the Strong-Rod anchor tiedown system.
Today, rod manufacturers design the continuous rod systems with design requirements (loading, geometry, etc.) Supporting documents (e.g., installation details, layouts, RFI/markups and calculations) are submitted for each unique project. Over the years, engineers have asked many questions related to the design of these systems. In this week’s blog, we will explore Frequently Asked Questions pertaining to Strong-Rod ATS systems used as shearwall overturning restraints (holdowns).
Is there a code report for the system?
The Strong-Rod ATS system is a series of rods (fully threaded rods and proprietary Strong-Rods), coupler nuts, bearing plates, nuts and shrinkage compensation devices (ATUD/TUD and RTUD).
The majority of these components are designed in accordance with the building code and reference standards (e.g., NDS, AISC). A project-specific calculation package is submitted for each job that addresses the evaluation of these elements. Therefore, these elements are not listed in evaluation reports.
Shrinkage compensation devices, on the other hand, are proprietary components which are not addressed by the building code or reference standards. Therefore, they are tested in accordance with ICC-ES acceptance criteria AC316 and are listed in ICC-ES ESR-2320.
What is the material specification of the rods used above concrete?
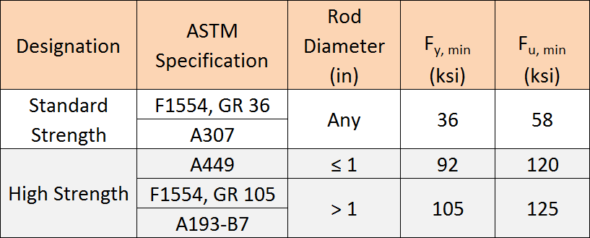
The specified rod materials are shown in Table 1.
Can threaded rods or couplers be welded to steel beams?
Simpson Strong-Tie generally does not recommend this practice. Of the materials listed in Table 1, ASTM A307 material is the only specification that contains supplementary requirements for welding. When standard strength rod is supplied to the job, it is not guaranteed that this will be the material provided.
ASTM A449 and A193-B7 high-strength rods develop strength and ductility characteristics through controlled quenching and tempering treatments. Quenching is the rapid cooling of metal (usually by water or oil) to increase toughness and strength. This process often increases brittleness. Tempering is a controlled reheating of the metal which increases ductility after the quenching process. Precise timing in the application of temperature during the tempering process is critical to achieving a material with well-balanced mechanical properties. It is unlikely that field welding will satisfy the requirements of quenching and tempering.
Coupler nuts are generally fabricated from material exhibiting characteristics similar to high-strength rods. Thus, it is not recommended to weld coupler nuts to steel beams due to the potential for embrittlement.
Simpson Strong-Tie specifies a weldable cage which is fabricated from ASTM A36 material for such applications.
How do you calculate the Maximum ASD Tension Capacity provided in the job summary?
Simpson Strong-Tie provides a comprehensive design package for continuous rod systems used as holdowns for multi-story stacked shearwalls. The individual run calculations, as shown in Figure 1, provide the Maximum Tension Capacity, which correlates to the maximum force the system can deliver. Plan check often requests justification on how these values are derived at each level. These values are calculated, and the process explained below may be used on any Simpson Strong-Tie ATS Job Summary as justification.
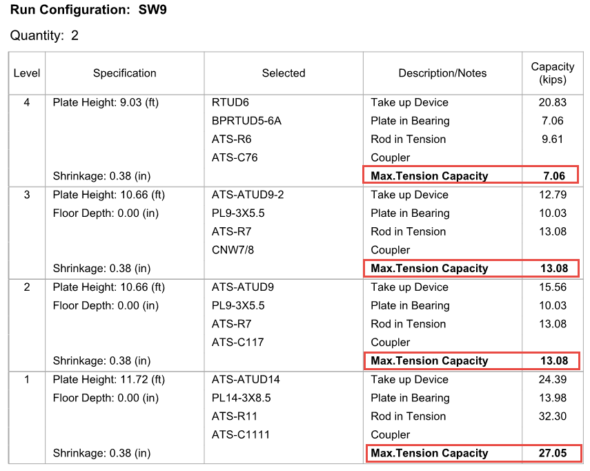
The maximum tension capacity published within the Job Summary and the Installation Details is derived using the following procedure:
- Step 1: Evaluate the top-most level. Compare the published capacities of the rod in tension, plate in bearing and the take-up device. The lowest of these three will govern and becomes the Maximum Tension Capacity for this level.
- Step 2: Evaluate the next level down. (a) Sum the Maximum Tension Capacity from Step 1 and the published capacity of the take-up device from this level. (b) Sum the Maximum Tension Capacity from Step 1 and the published capacity of the plate in bearing from this level. (c) Compare derived values from (a) and (b) to the published capacity of rod in tension. The lowest of these three values will govern and becomes the Maximum Tension Capacity of this level.
- Step 3: Repeat Step 2 as necessary until the bottom-most level is reached.
Applying this procedure to the sample run, SW9, will wield the following result:
- Step 1: Evaluate capacities published at Level 4
- Plate in bearing (PBRTUD5-6A) = 7.06 kips governs
- Take-up device (RTUD6) = 20.83 kips
- Rod in tension (ATS-R6) = 9.61 kips
- The lowest value in Step 1 is the plate in bearing, hence 7.06 kips is the maximum load that can be delivered at Level 4 and is the Maximum Tension Capacity.
- Step 2: Evaluate capacities at Level 3
- Maximum Tension Capacity from Level 4 = 7.06 kips (See Step 1)
- Maximum Tension Capacity from Level 4 + take-up device (ATS-ATUD9-2) = 7.06 + 12.79 = 19.85 kips
- Maximum Tension Capacity from Level 4 + plate in bearing (PL9-3×5.5) = 7.06 + 10.03 = 17.09 kips
- Rod in tension (ATS-R7) = 13.08 kips governs
- The lowest value in Step 2 is the rod in tension, hence 13.08 kips is the maximum load that can be delivered at Level 3 and is the Maximum Tension Capacity.
- Step 3: Evaluate capacities at Level 2
- Maximum Tension Capacity from Level 3 = 13.08 kips (See Step 2)
- Maximum Tension Capacity from Level 3 + take-up device (ATS-ATUD9-2) = 13.08 + 15.56 = 28.64 kips
- Maximum Tension Capacity from Level 3 + plate in bearing (PL9-3×5.5) = 13.08 + 10.03 = 23.11 kips
- Rod in tension (ATS-R7) = 13.08 kips governs
- The lowest value in Step 3 is the rod in tension, hence 13.08 kips is the maximum load that can be delivered at Level 2 and is the Maximum Tension Capacity.
- Step 4: Evaluate capacities at Level 1
- Maximum Tension Capacity from Level 2 = 13.08 kips (See Step 3)
- Maximum Tension Capacity from Level 2 + take-up device (ATS-ATUD14) = 13.08 + 24.39 = 37.47 kips
- Maximum Tension Capacity from Level 2 + plate in bearing (PL14-3×8.5) = 13.08 + 13.98 = 27.05 kips governs
- Rod in tension (ATS-R11) = 32.30 kips
- The lowest value in Step 4 is due to the plate in bearing, hence 27.05 kips is the maximum load that can be delivered at Level 1 and is the Maximum Tension Capacity.
In the System Deflection Summary page(s) of the Job Summary, is the Total System Deflection provided at Allowable or Strength levels?
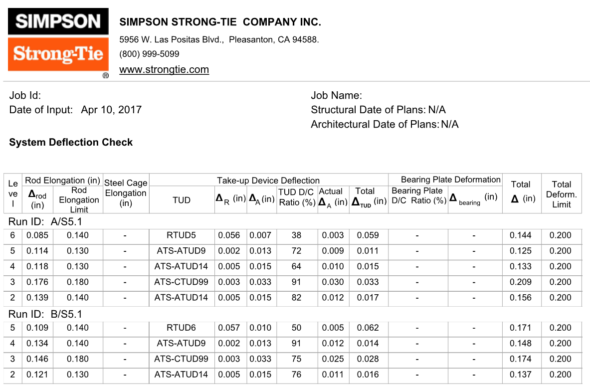
Immediately following the individual run calculations in each job summary, Simpson Strong-Tie provides a summary of deflection of the rod system similar to what is shown in Figure 2. This breaks down the deformation of all components being considered. In the example below, the rod elongation and deflection of the take-up device are summed to provide the total deflection.
The calculated system deflection is presented at ASD level. See section below for how to use these system deflections for your drift calculation.
What system deflection limit do you typically design to, and what does that include?
Unless otherwise specified on the plans or required by the building jurisdiction, Simpson Strong-Tie will design the continuous rod system to satisfy the deformation limits set forth in ICC-ES Acceptance Criteria (AC316). In some instances, the Designer may need a more restrictive deformation due to project specific conditions (e.g., tight building separations) and will require rod manufacturers to design for a lower deformation. Some jurisdictions (e.g., City of San Diego, City of San Francisco) may also have specific design requirements that continuous rod systems must conform to. The minimum recommended per-floor deformation limit set forth in AC316 is:
(Rod Elongation) + (Shrinkage Compensation Device Deflection) ≤ 0.2” (ASD),
Or (PDL/AE) + [ΔR + ΔA(PD/PA)] ≤ 0.2” (ASD)
Where:
PD = ASD demand cumulative tension load (kips)
L = length of the rod between restraints – i.e., floor-to-floor (in.)
A = net tensile area of the rod (in.2)
E = Young’s Modulus of Elasticity (29,000 ksi)
ΔR = seating increment of the shrinkage compensation device (as published in ICC-ES evaluation report)
ΔA = deflection of the shrinkage compensation device at the allowable load (as published in ICC-ES evaluation report)
PA = Allowable capacity (kips)
Should deformation limits be specified in the construction documents?
Simpson Strong-Tie strongly recommends this information be included in the construction documents. Along with the cumulative tension and compression forces, the required deformation limits for the holdown are important to ensure that rod manufacturers are designing the holdown to satisfy the desired shearwall performance.
How do I use the system deformation limit?
The System Deflection is the total deformation of the holdown system from floor to floor (refer to the last two columns in Figure 2). This information represents the total ASD holdown deformation term, Δa, for each level and is to be used in the shearwall drift equation from the Special Design Provisions for Wind and Seismic (2015 SDPWS 4.3-1).
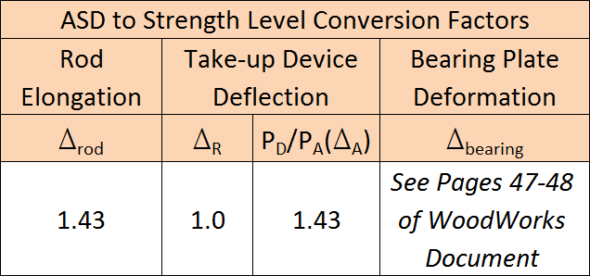
ASCE 12.8.6 requires that shearwall drift be calculated at strength level. Therefore, the information provided within the System Deflection Summary page needs to be converted from ASD to Strength Level. The conversion factors in Table 2 can be used to convert the ASD deformations to strength level. For discussions and methodology in converting bearing plate deformation to strength level, please refer to the WoodWorks Design Example of a Five-Story Wood Frame Structure over Podium Slab found here.
Can rod systems be used in Type III construction?
Yes! 2015 IBC §2303.2.5 requires that Fire Retardant-Treated Wood (FRTW) design values be adjusted based on the type of treatment used on the project. Adjustment factors vary for each FRTW manufacturer; refer to the ICC-ES evaluation report of the specified FRTW manufacturer for the unique adjustment values. Rod manufacturers need to know what treatment is being used so this information can be taken into consideration when designing compression posts and incremental bearing (bearing plates).
For more information and previous discussions on fire protection in mid-rise construction, see our previous posts: Fire Protection Considerations with Five-Story Wood-Frame Buildings Part 1 and Part 2, and Connectors and Fasteners in Fire-Retardant-Treated Wood.
What are Simpson Strong-Tie’s guidelines for fire caulking material?
While there are many options for fire-rated caulking, these products can be used in conjunction with the Simpson Strong-Tie ATS system. Below is a list of considerations when selecting and specifying a material for use where the rods penetrate the top and sole plates:
- The fire-rated caulking shall not be corrosive to metal when used in contact with ATS components.
- Direct contact with shrinkage compensating devices (e.g., TUD, ATUD, RTUD) shall be avoided. Shrinkage compensating devices have moving components and may not function properly with debris interference.
- Indirect contact with shrinkage compensating devices shall also be avoided. Shrinkage compensation accumulates up the building and therefore the largest shrinkage occurs at the top of the building. As such, when the building shrinks, remnants of the material may still be stuck to the threads of the rod and may be detrimental to the performance of some shrinkage compensating devices (e.g., an RTUD). It is recommended to detail the installation with shrinkage taken into consideration.
- The fire-rated caulking should be pliable to accommodate wood shrinkage and the building moving down during this process.
- The performance and the suitability of fire-rated caulking are outside the scope of Simpson Strong-Tie.
Why doesn’t your design include compression post design?
If the Engineer of Record has already specified compression posts to be used with a continuous rod system, Simpson Strong-Tie will not provide these on the holdown installation drawings. This is primarily done to prevent discrepancies between the specification in the contract documents and what is shown on the installation drawings.
What is the maximum spacing between compression posts?
For platform-framed structures, the maximum spacing between compression posts is 9″. The large majority of Simpson Strong-Tie bearing plates will fit within the 9″ spacing requirement, eliminating the need for notching compression posts. In some framing conditions, such as balloon framing or a top chord bearing truss, the maximum spacing will be reduced to 6″. This is due to the limited amount of space between the top of the compression posts transferring uplift (via bearing) into the point of restraint (e.g., bearing plate) at the level above. To ensure this load path is complete, the posts need to be spaced closer.
What is the nailing schedule for the bridge block to the king studs?
Simpson Strong-Tie doesn’t recommend nailing the bridge block to the cripple as the bridge block member will shrink. Locking the bridge block in place may result in a gap forming between the bottom of the bridge block member and the top of the cripple studs, which is not accounted for in the Total System Deflection.
Are there any published documents with design examples of continuous rod systems used in mid-rise construction?
There are two resources publicly available that provide discussion and examples. The first is a manual published by the Structural Engineers Association of California (SEAOC). Titled 2015 IBC SEAOC Structural/Seismic Design Manual Volume 2 – Examples for Light-Frame, Tilt-Up and Masonry Buildings, this document provides two examples – one for a four-story wood hotel building, and the other for a three-story cold-formed steel apartment building on concrete podium deck.
Another useful resource is published by WoodWorks and is a design example of a five-story wood-frame structure over podium slab. This document can be found here.
What questions do you have about the Strong-Rod ATS System? Leave them below.
California Has Funding for $3,000 Grants for Home Retrofits
Are you an engineer working with California clients whose homes were built before 1979 on a raised foundation?
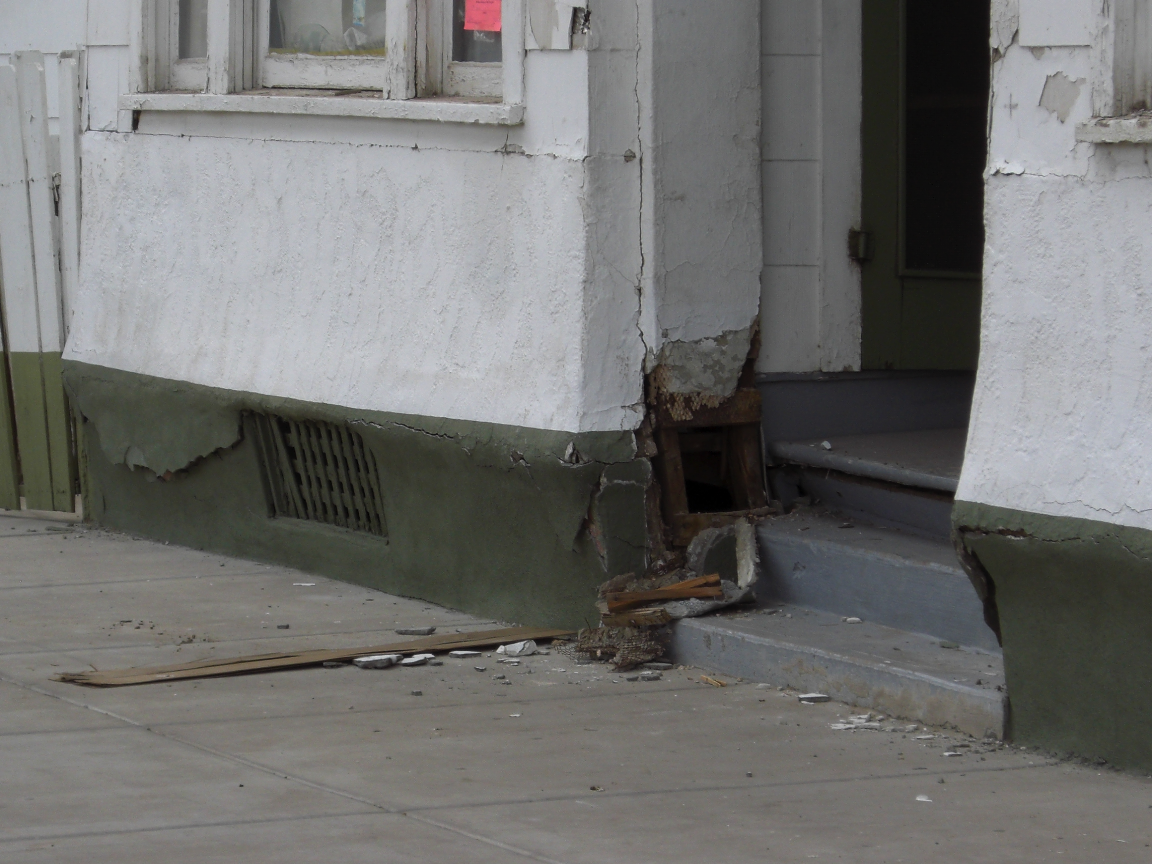
If you are, these clients may be among the 1.2 million California homeowners eligible for a seismic home retrofit. The state of California has approved the continuation of an initiative known as Earthquake Bolt + Brace (EBB). In its second year, this program plans to make as many as 1,600 grants to selected homeowners, nearly three times the number given the previous year. The EBB grant program provides up to $3,000 to homeowners residing in more than 150 California zip codes. Check to see whether your clients live within one of these communities here.
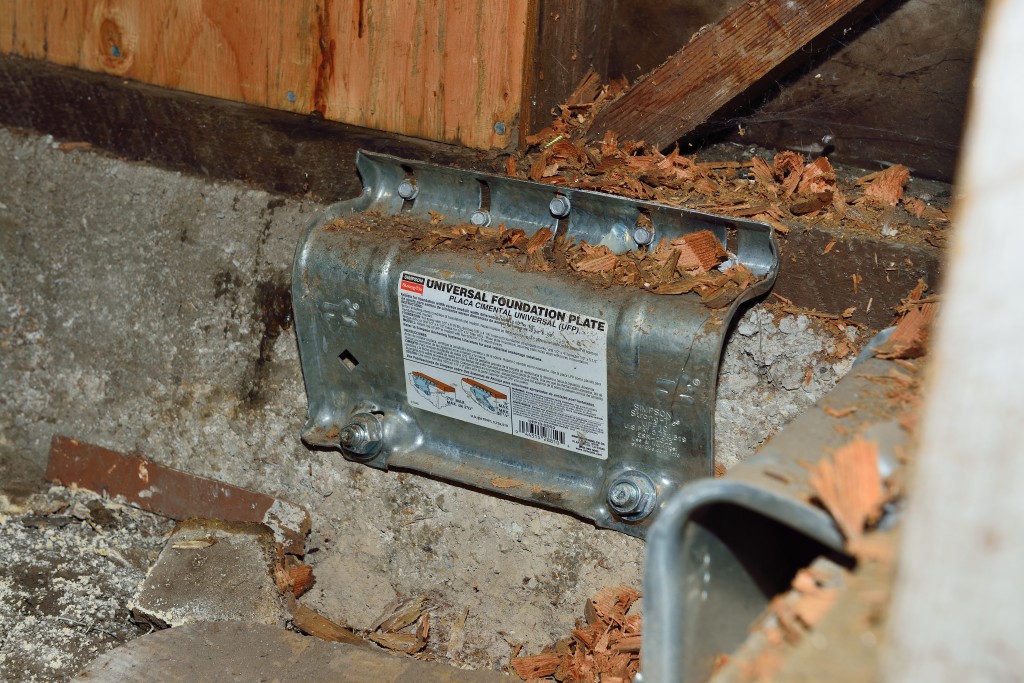
Simpson Strong-Tie has several different resources to assist you in helping your clients understand how to mitigate seismic risks to houses with raised foundations. The Seismic Retrofit Details sheet provides various ways to retrofit the cripple wall system using prescriptive methodologies, which can be adapted for engineered solutions. The picture below highlights the use of the Simpson Strong-Tie universal foundation plate (UFP) to attach the boltless sill plate of the cripple wall to the concrete stemwall. This simple step can help prevent the house from sliding off its foundation. The picture also reveals plywood sheathing used to reinforce the weak cripple wall system. Additional resources for retrofit can be found here.
To help your clients better understand the impact these simple steps can have in preventing structural damage in an earthquake, click here to watch the story of a Napa business women who had purchased a structure with a raised foundation for her business and retrofitted it just prior to the 2014 M6.0 Napa earthquake, which caused considerable damage to many similar structures.
Let your clients know that the time to apply is very limited if they think they qualify for a retrofit grant. Registration for the 2016 EBB program ends on February 20. To register or learn more about the program, visit www.earthquakebracebolt.com.
When you finish a retrofit for one of your clients, we want to hear how it went. Let us know in the comments below.
“You Cannot Escape Responsibility Tomorrow by Evading it Today”
While the contents of this blog are certainly not what Abraham Lincoln had in mind when he made the statement that I’m using to title this blog post, it does speak volumes to the pertinence of what will be discussed today. “Design by others” or some variation of this appears in many parts of Simpson Strong-Tie details.Continue Reading
Connectors and Fasteners in Fire-Retardant-Treated Wood
In any given year, Simpson Strong-Tie fields several questions about the use of our connectors and fasteners with pressure-treated fire-retardant wood products. Most often asked is whether this application meets the building code requirements for Type III construction, and whether there is a legitimate concern about corrosion. While there haven’t been any specific discussions on this topic in the SE Blog, there have been related discussions surrounding sources of corrosion, such as: Corrosion: The Issues, Code Requirements, Research and Solutions, Corrosion in Coastal Environments, Deck Fasteners – Deck Board to Framing Attachments. This post will explore several resources that we hope will enable you to make an informed decision about which type of pressure-treated Fire-Retardant-Treated Wood (FRTW) to choose for use with steel fasteners and connectors.
One factor contributing to the frequency of these questions is the increased height of buildings now being constructed. With increased height, there is a requirement for increased fire rating. To meet the minimum fire rating for taller buildings, the building code requires noncombustible construction for the exterior walls. As an exception to using noncombustible construction, the 2015 International Building Code (IBC®) section 602.3 allows the use of fire-retardant wood framing complying with IBC section 2303.2. This allows the use of wood-framed construction where noncombustible materials would otherwise be required.
In the 2009 IBC, Section 2304.9.5, “Fasteners in preservative-treated and fire-retardant-treated wood,” was revised to include many subsections (2304.9.5.1 through 2304.9.5.4) dealing with these wood treatments in various types of environmental applications. Section 2304.9.5.3 addressed the use of FRTW in exterior applications or wet or damp locations, and 2304.9.5.4 addressed FRTW in interior applications. These sections carried over to the 2012 IBC, and were moved to Section 2304.10.5 in the 2015 IBC. FRTW is listed in various other sections within the code. For more information about FRTW within the code (e.g., strength adjustments, testing, wood structural panels, moisture content), the Western Wood Preservers Institute has a couple of documents to consult: 2009 IBC Document and 2013 CBC Document. They also have a number of different links to various wood associations.
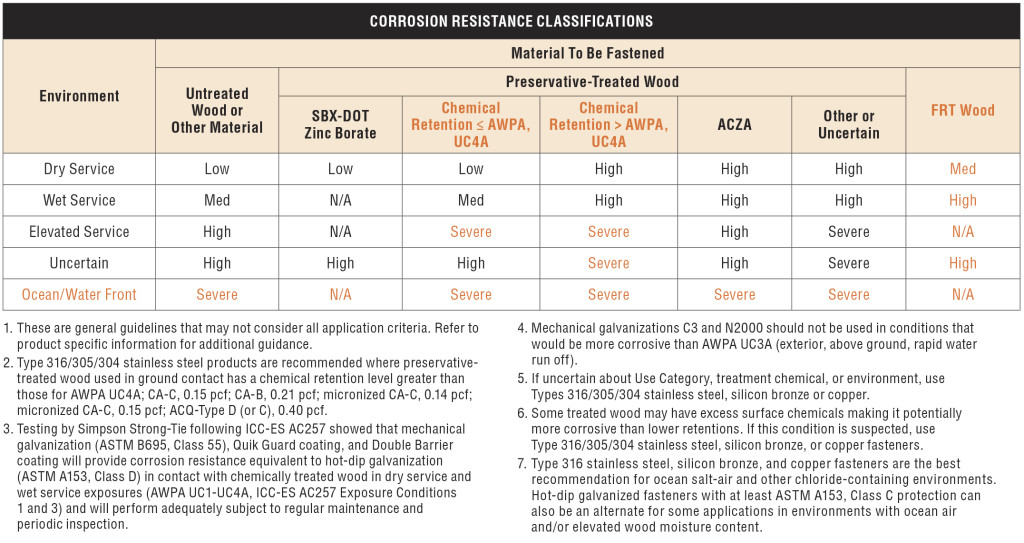
As shown in Figure 1 below, fasteners (including nuts and washers) used with FRTW in exterior conditions or where the wood’s service condition may include wet or damp locations need to be hot-dipped zinc-coated galvanized steel, stainless steel, silicon bronze or copper. This section does permit other fasteners (excluding nails, wood screws, timber rivets and lag screws) to be mechanically galvanized in accordance with ASTM B 695, Class 55 at a minimum. As shown in Figure 2, fasteners (including nuts and washers) used with FRTW in interior conditions need to be in accordance with the manufacturer’s recommendations, or, if no recommendations are present, to comply with 2304.9.5.3.


In Type III construction where the exterior walls may be FRTW in accordance with 2012 IBC Section 602.3, one question that often comes up is whether the defined “exterior wall” should comply with Section 2304.9.5.3 or 2304.9.5.4. While there are many different views on this point, it is our opinion at Simpson Strong-Tie that Section 2304.9.5.4 would apply to the exterior walls. Since the exterior finishes of the building envelope are intended to protect the wood and components within its cavity from exterior elements such as rain or moisture, the inside of the wall would be dry.
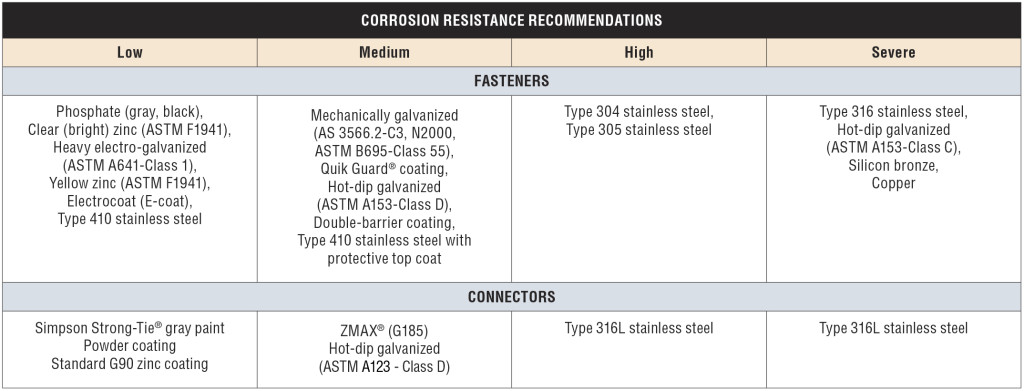
There are many FRTW product choices on the market; take a look at the American Wood Council’s list of treaters. Unlike the preservative-treated wood industry, however, the FRTW industry involves proprietary formulations and retentions. As a result, Simpson Strong-Tie has not evaluated the FRTW products. In our current connector and fastener catalogs, C-C-2015 Wood Connector Construction and C-F-14 Fastening Systems, you will find a newly revised Corrosion Resistance Classifications chart, shown in Figure 3 below, which can be found on page 15 in each catalog. The FRTW classification has been added to the chart in the last column. The corrosion protection recommendations for FRTW in various environmental applications is set to medium or high, corresponding to a number of options for connectors and fasteners as shown in the Corrosion Resistance Recommendations chart, shown in Figure 4. These general guideline recommendations are set to these levels for two reasons: (1) there are unknown variations of chemicals commercially available on the market, and (2) Simpson Strong-Tie has not conducted testing of these treated wood components.
The information above is not the only information readily available. There are many different tests that can be done on FRTW, as noted in the Western Wood Preservers Institute’s document. One such test for corrosion is Military Specification MIL-1914E, which deals with lumber and plywood. Another is AWPA E12-08, Standard Method of Determining Corrosion of Metals in Contact with Treated Wood. Manufacturers of FRTW products who applied for and received an ICC-ES Evaluation Report must submit the results of testing for their specific chemicals in contact with various types of steel. ICC-ES Acceptance Criteria 66 (AC66), the Acceptance Criteria for Fire-Retardant-Treated Wood, requires applicants to submit information regarding the FRTW product in contact with metal. The result is a section published in each manufacturer’s evaluation report (typically Section 3.4) addressing the product use in contact with metal. Many published reports contain similar language, such as “The corrosion rate of aluminum, carbon steel, galvanized steel, copper or red brass in contact with wood is not increased by (name of manufacturer) fire-retardant treatment when the product is used as recommended by the manufacturer.” Structural engineers should check the architect’s specification on this type of material. Product evaluation reports should also be checked to ensure proper specification of hardware and fastener coatings to protect against corrosion. Each evaluation report also contains the applicable strength adjustment factors, which vary from one product to another.
Selecting the proper FRTW product for use in your building is crucial. There are many different options available. Be sure to select a product based on the published information and to communicate that information to the entire design team. Evaluation reports are a great source of information because the independently witnessed testing of manufacturers has been reviewed by the agency reviewing the report. Finally, understanding FRTW chemicals and their behavior when in contact with other building products will ensure expected performance of your structures.
What has been your experience with FRTW? What minimum recommendations do you provide in your construction documents?
Steel Strong-Wall® Footings Just got a Little Slimmer!
While 54 inches is a good height and will get you on most amusement park rides, what about this dimension for the width of a footing? We did some tests recently — actually a lot of tests — that answered that question.
Steel Strong-Wall® narrow panels are great for resisting high seismic or wind loads, but due to their narrow widths, their resulting anchor uplift forces can be rather hefty, requiring very large pad footings. How large? For Seismic Design Categories C-F, the largest cracked concrete solution per ACI318-11 Appendix D has a width of 54 inches and an effective embedment depth of 18 inches in order to ensure the anchor remains ductile. The overall length of this footing, as seen in Figure 1, can be up to 132 inches. While purely code driven, these solutions have historically presented challenges in the field. Most concrete contractors have to dig footings this size by hand. This often leads to discussions with their engineers about finding a better solution.

Simpson Strong-Tie has been studying cast-in-place anchorage extensively in recent years. Our research has been featured in a couple of blog posts: The Anchorage to Concrete Challenge – How Do You Meet It? and Podium Anchorage – Structure Magazine. Concrete podium slab anchorage was a multi-year test program that started with grant funding from the Structural Engineers Associations of Northern California for initial concept testing at Scientific Construction Laboratories Inc. and wrapped up with full-scale detailed testing completed at the Simpson Strong-Tie Tye Gilb Laboratory in Stockton, California. This joint venture studied the performance of anchorage reinforcement into thin podium deck slabs (10-14 inch) to resist the high overturning forces of continuous rod systems on 4-5-story mid-rise construction. The testing confirmed the need to comply with Appendix D requirements to prevent plastic hinging at anchor locations. Be on the lookout for an SE Blog post on that topic in the near future. Armed with what we learned, we decided to develop tested anchor reinforcing solutions for the Steel Strong-Wall.
The newly developed anchor reinforcement solutions for grade beams are calculated in accordance with ACI318 Appendix D and tested to validate performance. Anchor reinforcement isn’t a new concept, as it’s been in ACI318 for some time. Essentially, anchor reinforcements transfer load from the anchor bolt to the reinforcing, which restrains the breakout cone from occurring. For the new grade beam details, the additional ties near the anchor are designed to resist the load from the anchor and are developed into the grade beam. The new details offer solutions with widths as narrow as 18 inches when anchor reinforcement is used.
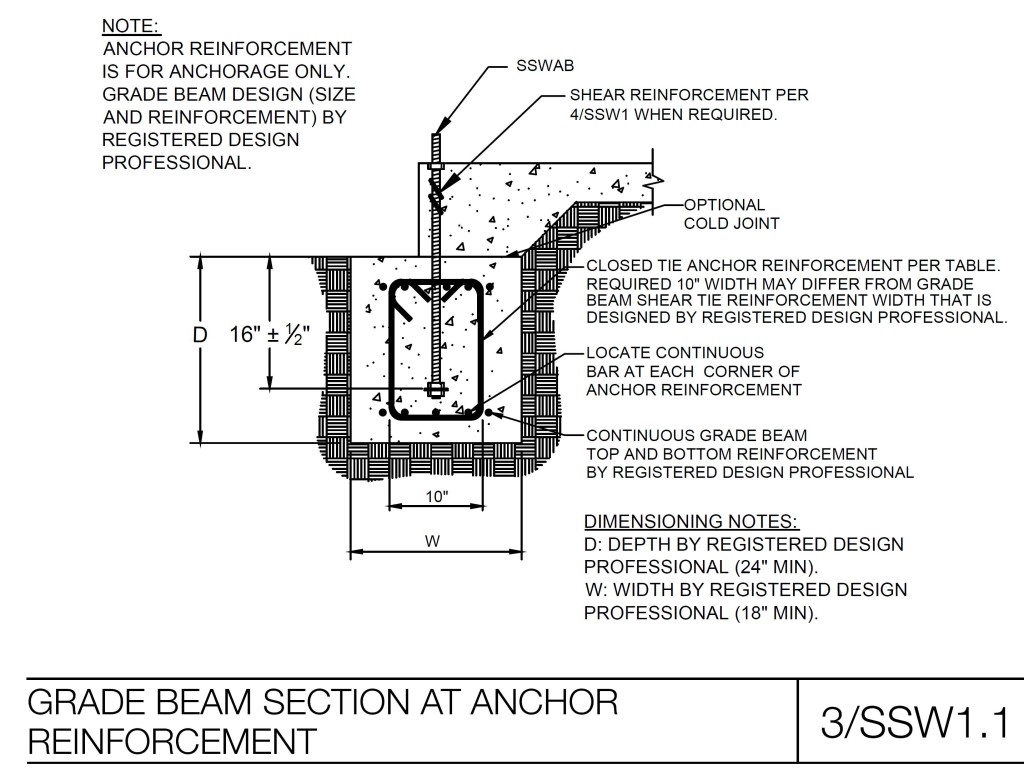
Two details have been developed: one for the larger panels (SSW18, SSW21, SSW24) as shown in Detail 1/SSW1.1, and one for the smaller panels (SSW12, SSW15) as shown in Detail 2/SSW1.1. The difference between the two is the number of anchor reinforcement ties specified in Detail 3/SSW1.1. For SSW18, SSW21 and SSW24 panels (Detail 1/SSW1.1), the total number of reinforcement per anchor is specified. Due to their smaller sizes, the anchor reinforcement ties specified in Detail 2/SSW1.1 for the SSW12 and SSW15 panels are the total required per panel.


Validation Testing
From the concrete podium deck anchorage test program, we discovered that the flexural and shear capacity of the slab is critical to anchor performance and must be designed to exceed the demands created by the attached structure. For grade beams, this also holds true. In wind-load applications, this demand includes the factored demand from the Steel Strong-Wall. In seismic applications, our testing and analysis showed that achieving the anchor performance expected by Appendix D design methodologies requires the concrete member design strength to resist the amplified anchor design demand from Appendix D Section D.3.3.4.3.
Validation testing was conducted to evaluate this concept. The test program consisted of a number of specimens with different configurations, including:
- Closed tie anchor reinforcement
- Non-closed tie u-stirrup anchor reinforcement
- Control specimen without anchor reinforcement
Flexural and shear reinforcement were designed to resist Appendix D amplified anchorage forces and were compared to test beams designed for non-amplified strength level forces. The results of the testing are shown in Figure 2. In the higher Seismic Design Categories (C-F), the anchor assembly must be designed to satisfy Section D.3.3.4.3 in ACI318-11 Appendix D. In accordance with D.3.3.4.3 (a), the concrete breakout strength needs to be greater than 1.2 times the nominal steel strength of the anchor, 1.2NSA. This requires a concrete breakout strength of 87 kips for a Steel Strong-Wall that uses a 1-inch high-strength anchor.
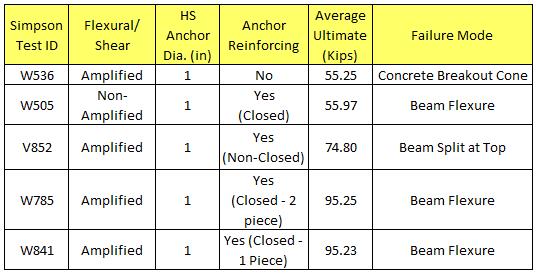
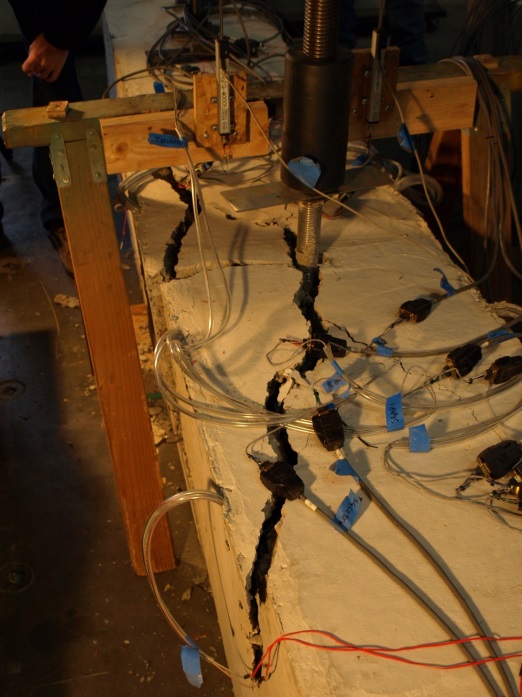
Grade beams without the anchor reinforcement detail and with flexural and shear reinforcement designed to the Appendix D amplified anchorage forces performed similar to those with closed-tie anchor reinforcement and flexural and shear reinforcements designed to the non-amplified strength level forces. Both, however, came up short of the necessary forces required by Section D.3.3.4.3 (a). From Test V852, we discovered that even though the flexural and shear reinforcement were designed with the amplified forces, the non-closed tie u-stirrups did not ensure the intended performance. From observation, the u-stirrups do not provide adequate confinement of the concrete and tend to open up under loading conditions, resulting in splitting of the beam at the top as can be seen in the photo.
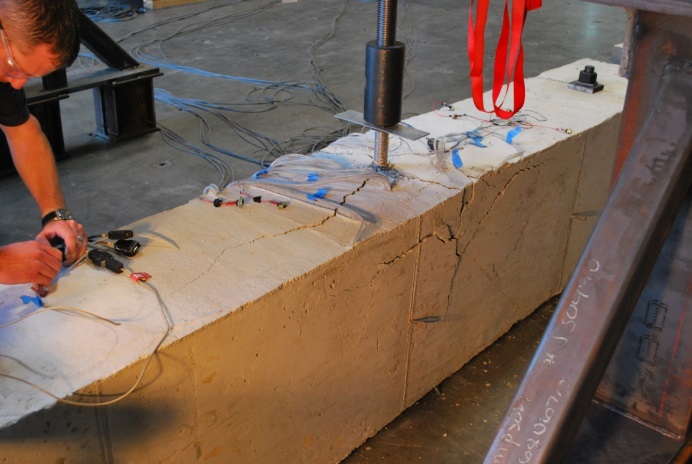
Tests W785 and W841 resulted in the best performance. Both test specimens contained flexural and shear reinforcement designed for the amplified forces, as well as closed-ties. Two configurations were tested to study their performance — two piece closed-tie anchor reinforcement in W785 and a single piece closed-tie anchor reinforcement in Test W841. As seen in Figure 2, their performance was very similar, and met the requirements of Section D.3.3.4.3 (a). The closed-ties helped confine the concrete near the top of the beam, allowing the assembly to reach the expected performance load (See the photo below). It’s important to indicate the following specifics in the New Grade Beam Anchor Reinforcement Details:
- Anchor Reinforcement is #4 closed-ties
- SSWAB embedment depth is 16″ +/- ½” (as shown in Detail 3/SSW1.1). This is to ensure there is enough development length of the anchor reinforcement on both sides of the theoretical breakout surface as required by ACI318-11 D.5.2.9.
- The minimum distances from the anchor bolt plate washer to top and bottom of closed tie reinforcement are 13 inches and 5 inches respectively to ensure proper development above and below the concrete breakout cone (refer to Detail 3/SSW1.1).
- The spacing between the two vertical legs of the anchor reinforcement tie must be 10 inches apart. While this may differ from your shear reinforcement elsewhere in the grade beam, it ensures the reinforcement is located close enough to the anchor and adequate development length is provided.
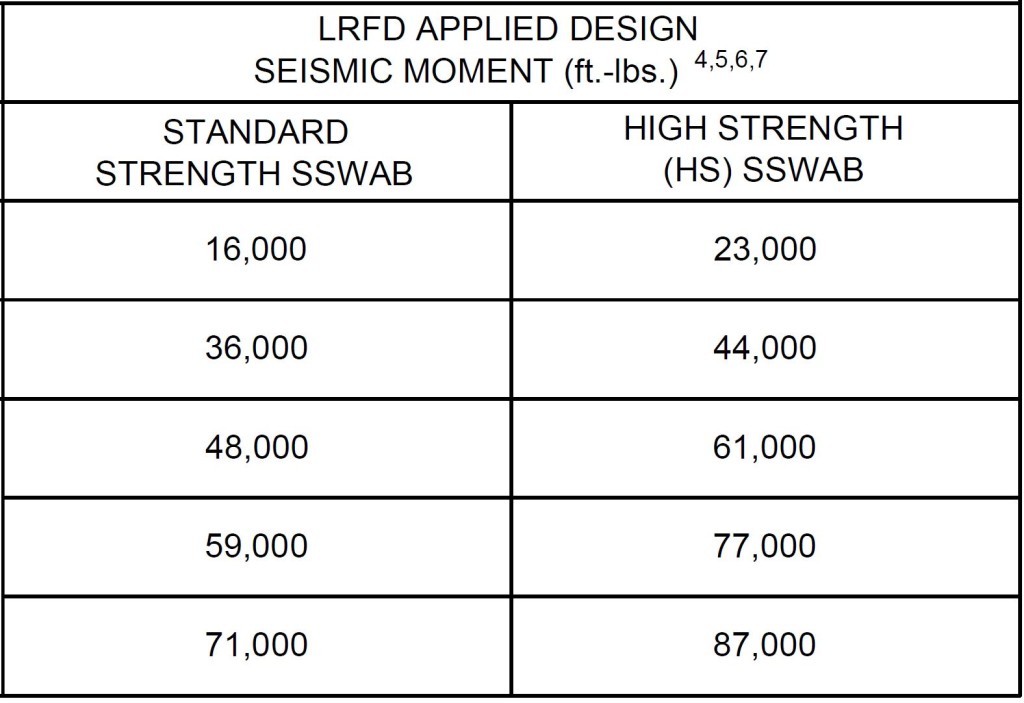
- Flexural reinforcement (top and bottom) and shear reinforcement (ties throughout the grade beam length) are per the designer. Simpson Strong-Tie has provided information in Detail 3/SSW1.1 for the applicable minimum LRFD Applied Design Seismic Moment (See Figure 3) to make sure the grade beam design will at least resist the applied anchor forces. Project design loads not related to the Strong-Wall panel also should be considered and could control the grade beam design.
Simpson Strong-Tie is interested in hearing your thoughts on the new details. What is your opinion? How have the new details been received on your job sites?
Resilience by Design: City of Los Angeles Lays Out a Seismic Safety Plan
“From a seismological standpoint, Northridge was not a big earthquake.” This is first sentence of the “Resilience by Design” report by L.A. Mayor’s Seismic Safety Task Force led by Dr. Lucy Jones of the U.S. Geological Survey (USGS). The report is the culmination of a year-long investigation into the greatest vulnerabilities of the city from a major seismological event. Continue Reading
The Importance of Resilient Communities During Earthquakes
Imagine that it’s 4:30 a.m. and suddenly you’re awakened by strong shaking in your home. Half asleep, you hang on to your bed hoping that the shaking will stop soon. All of a sudden, the floor gives away and you fall. You think, “What just happened? How could this have possibly occurred? Am I alive?”
These could have been the thoughts of Southern California residents living in one of the many apartment buildings, which collapsed on January 17, 1994, during a 6.7 magnitude earthquake. The Northridge Earthquake brought awareness to buildings in our communities with a structural weakness known as a soft story, a condition that exists where a lower level of a multi-story structure has 20% or less strength than the floor above it. This condition is prevalent in buildings with tuck-under parking and is found in multistory structures throughout San Francisco, Los Angeles and other cities (see Figure 1). These structures are highly susceptible to major damage or collapse during a large seismic event (see Figure 2).
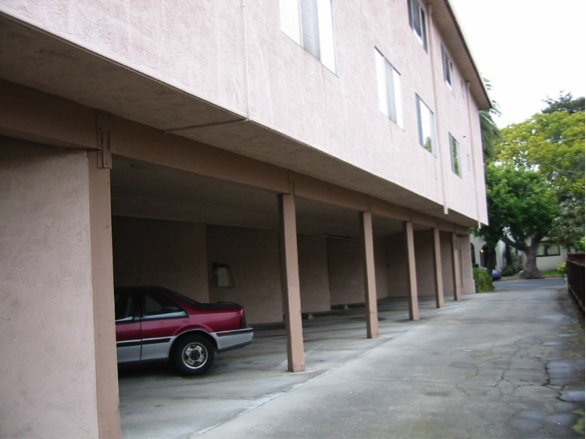
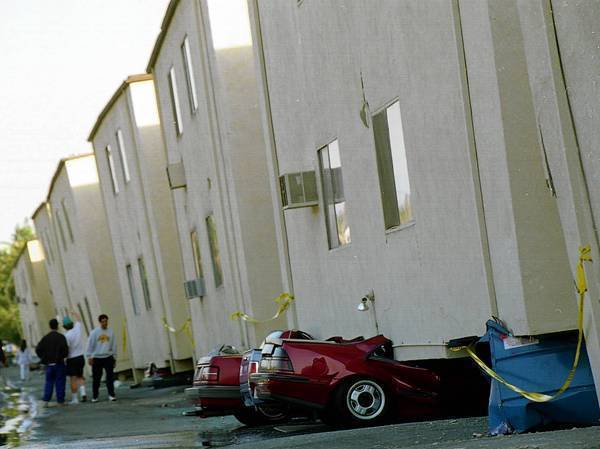
Soft story retrofits help to strengthen our communities and make them more resilient to major disasters. There are several resources available to structural engineers that need to retrofit weak-story buildings. Some of these resources are mentioned in our September 18 blog post.
During the 2014 SEAOC Convention held in Indian Wells on September 10-13, speakers discussed different methods, analysis and research that address the behavior of various materials and construction types during seismic events along with approaches to retrofit historically poor performing structures. This information can be viewed from the convention’s proceedings available at www.seaoc.org.
On October 20, 2014, the Structural Engineers Association of Southern California (SEAOSC) will be hosting their 4th annual Strengthening Our Cities BAR Summit in downtown Los Angeles. This event brings together many different stakeholders in our built environment, including public officials, building owners and managers, business owners, insurance industry representatives, emergency managers and first responders, and design professionals.
Many prestigious thought leaders, including USGS Seismologist Dr. Lucy Jones will be speaking at the summit, discussing such topics as tools and analysis methods for retrofitting vulnerable buildings and the Building Occupancy Resumption Program (BORP).
Expect a great day full of useful information about ways to strengthen our communities and prepare for major earthquakes as well as opportunities to network with like-minded peers. For additional information and to register, visit www.barsummit.org. We also hope you’ll visit our booth. We look forward to speaking with you there.
Special Moment Frame Installation: What Structural Engineers Should Watch For
Launched in January 2013, the Simpson Strong-Tie® Strong Frame® special moment frame (SMF) has been successfully used on many projects around the country. We’ve explored several aspects of the frame in previous blog posts, including beam bracing requirements, soft story retrofits, and the San Francisco retrofit ordinance. If you have specified the Strong Frame SMF on your project, here are a few helpful items to review during your structural observations at installation.
When the special moment frame is ordered, Simpson Strong-Tie sends the contractor a frame verification sheet to verify the dimensions (Figure 1). It is not uncommon for minor adjustments to be made to accommodate specific field conditions. We recommend the framer follow up with the Designer to ensure the needed modifications do not alter the design of the frame based on deflection or strength stand point limitation(s). Once we receive the signed verification, we begin fabricating the frame. The accompanying concrete anchors are usually shipped before the frame so they can be placed ahead of time.
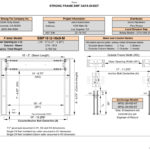 It all starts with the concrete! The majority of misinstallation issues involve anchorage placement. Anchors not placed correctly can alter the frame that’s already been ordered, affecting lead times or requiring retrofit to properly transfer the frame forces into the concrete. Contact your local Simpson Strong-Tie sales rep to help with any questions.
Placement of the Moment Frame Shear Lug (MFSL) is critical to ensure proper transfer of shear forces into the foundation. If you are visiting the jobsite prior to concrete placement, take a look at the orientation of the MFSL. The MFSL contains back-to-back structural angles placed at the top of concrete to transfer the shear component of the Strong Frame SMF forces into the concrete. Figure 2 shows the proper placement of the MFSL and template in relationship to the direction of the column.
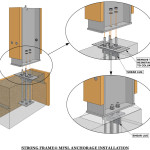
The template has a similar appearance to the shape and size of the column base plate, which sometimes leads to the tendency to orient the template 90 degrees from its proper installation, as shown in Figure 3. The template has two half circles at the center of the anchor bolts for proper measurement (center-to-center of columns) by the contractor, as shown in Figure 4.
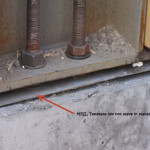
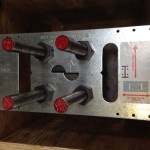
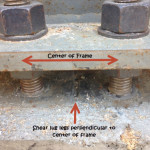
The templates are temporary and intended to be removed prior to frame installation (unlike the case in Figure 3). So placement of the shear lugs is more critical to verify than the direction of the template, since the contractor may remove the template and reinstall it in an alternate orientation. The vertical legs of the two structural angles should intersect the column’s weak axis (perpendicular to center of frame) as shown in Figure 5, and should not be placed parallel to the strong axis.
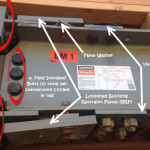
According to ASTM A325, installation requires 11 bolts snug tight at each beam-column connection (labeled “a” in Figure 6), and the column needs to be attached to the four anchor bolts into the base of each column. Many components of the Strong Frame SMF are factory-installed, including the Yield-LinkTM structural fuses, Buckling Restraint Plates (BRP), and nailers. The Yield-Link fuses and BRP should not be disassembled. Figure 6 illustrates an instance where the BRP was loosened during erection. The BRP prevents the Yield-Link fuses from buckling when the frame is subjected to compression forces. Contact Simpson Strong-Tie if you encounter this in the field.
The wood nailers may be replaced in kind. It is important to note that attachment of the nailers may not utilize all available bolt holes on the column and beam. Various holes are left unused for flexibility with installation of utilities and electrical wiring.
Lastly, often overlooked at installation are the required SDS screws through the column cap plate into the framing above (Figure 7). The SDS screws are included with the installation kit. They are required for bracing of the column on both faces of the column.
How is the Strong Frame special moment frame working for you? Please let us know in the comments!

