“Change is the only constant in life” and “When you are finished changing, you are finished” are quotes from the ancient Greek philosopher Heraclitus and Benjamin Franklin, respectively. I’m reminded of them as I review the numerous changes to codes and standards during the typical three to five-year development cycles. While code and standard changes can be challenging to incorporate into our work, they typically offer an improvement or expansion of design and construction solutions.
Tag: IBC
Choosing the Right Connections for Wind-Resistant Design
According to the Greek philosopher Heraclitus, “The only constant in life is change.”
When the latest Wood Construction Connectors catalog (C-C-2019) was published, my colleague, Paul McEntee, PE authored an excellent blog post to announce some big changes within the catalog. He shared that Simpson Strong-Tie® was the first in the industry with updated connector allowable load tables to meet the new ASTM test standards required by the 2015 and 2018 International Building Code® (IBC®). It was one of those rare times where being first didn’t exactly feel like winning.
Let me explain …
Top 10 Changes to Structural Requirements in the 2018 IBC
This blog post will continue our series on the final results of the 2016 ICC Group B Code Change Hearings, and will focus on 10 major approved changes, of a structural nature, to the International Building Code (IBC).
- Adoption of ASCE 7-16
- The IBC wind speed maps and seismic design maps have been updated.
- A new section has been added to Chapter 16 to address tsunami loads.
- Table 1607.1 has been revised to change the deck and balcony Live Loads to 1.5 times that of the occupancy served.
- New and Updated Reference Standards
- 2015 IBC Standard ACI 530/ASCE 5/TMS 402-13 will be TMS402-16.
- ACI 530.1/ASCE 6/TMS 602-13 will be TMS 602-16.
- AISC 341-10 and 360-10 have both been updated to 2016 editions.
- AISI S100-12 was updated to the 2016 edition.
- AISI S220-11 and S230-07 were updated to the 2015 edition.
- AISI S200, S210, S211, S212 and S214 have been combined into a new single standard, AISI S240-15.
- AISI S213 was split into the new S240 and AISI S400-15.
- ASCE 41-13 was updated to the 2017 edition.
- The ICC 300 and ICC 400 were both updated from 2012 editions to 2017 editions.
- ANSI/NC1.0-10 and ANSI/RD1.0-10 were all updated to 2017 editions.
- Section 1607.14.2 Added for Structural Stability of Fire Walls
- This new section takes the 5 psf from NFPA 221, so designers will have consistent guidance on how to design fire walls for stability without having to buy another standard.
- Modifications of the IBC Special Inspections Approved
- Section 1704.2.5 on special inspection of fabricated items has been clarified and streamlined.
- The Exception to 1705.1.1 on special inspection of wood shear walls, shear panels and diaphragms was clarified to say that special inspections are not required when the specified spacing of fasteners at panel edges is more than 4 inches on center.
- The special inspection requirements for structural steel seismic force-resisting systems and structural steel elements in seismic force-resisting systems were clarified by adding exceptions so that systems or elements not designed in accordance with AISC 341 would not have to be inspected using the requirements of that standard.
- Changes Pertaining to Storm Shelters
- A new Section 1604.11 states that “Loads and load combinations on storm shelters shall be determined in accordance with ICC 500.”
- An exception was added stating that when a storm shelter is added to a building, “the risk category for the normal occupancy of the building shall apply unless the storm shelter is a designated emergency shelter in accordance with Table 1604.5.”
- Further clarification in Table 1604.5 states that the type of shelters designated as risk category IV are “Designated emergency shelters including earthquake or community storm shelters for use during and immediately after an event.”
- Changes to the IBC Conventional Construction Requirements in Chapter 23
- The section on anchorage of foundation plates and sills to concrete or masonry foundations reorganized the requirements by Seismic Design Category (SDC) and added a new section on anchoring in SDC E. It also states that the anchor bolt must be in the middle third of the width of the plate and adds language to the sections on higher SDCs saying that if alternate anchor straps are used, they need to be spaced to provide equivalent anchorage to the specified 1/2″- or 5/8″-diameter bolts.
- The second change permits single-member 2-by headers, to allow more space for insulation in a wall.

- Modification to the Requirements for Nails and Staples in the IBC
- ASTM F1667 Supplement One was adopted that specifies the method for testing nails for bending-yield strength and identifies a required minimum average bending moment for staples used for framing and sheathing connections.
- Stainless-steel nails are required to meet ASTM F1667 and use Type 302, 304, 305 or 316 stainless steel, as necessary to achieve the corrosion resistance assumed in the code.
- Staples used with preservative-treated wood or fire-retardant-treated wood are required to be stainless steel.
- The new RSRS-01 nail was incorporated into TABLE 2304.10.1, the Fastening Schedule. The RSRS nail is a new roof sheathing ring shank nail designed to achieve higher withdrawal resistances, in order to meet the new higher component and cladding uplift forces of ASCE 7-16.
- Truss-Related Code Change
- The information required on the truss design drawings was changed from “Metal connector plate type” to “Joint connection type” in recognition that not all trusses use metal connector plates.
- Code Change to Section 2304.12.2.2
- A code change clarifies in which cases posts or columns will not be required to consist of naturally durable or preservative-treated wood. This change makes the requirements closer to the earlier ones, while maintaining consistency with the subsequent section on supporting members.
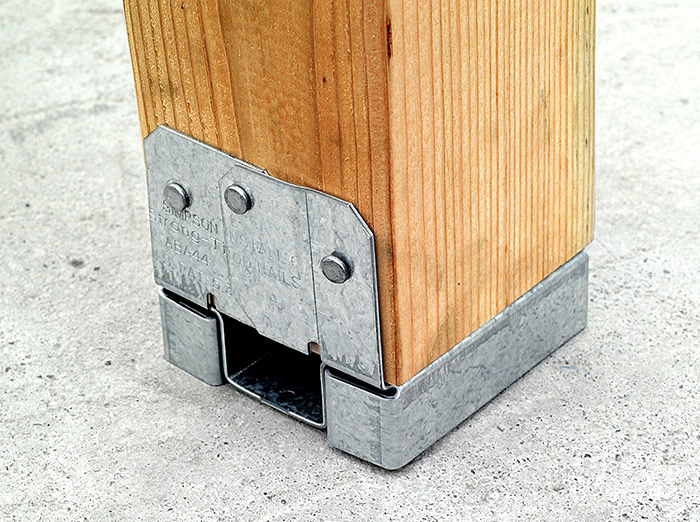
- If a post or column is not naturally durable or preservative-treated, it will have to be supported by concrete piers or metal pedestals projecting at least 1″ above the slab or deck, such as Simpson Strong-Tie post bases that have a one-inch standoff.
- Code Change to IBC Appendix M
- A code change from FEMA makes IBC Appendix M specific to refuge structures for vertical evacuation from tsunami, and the tsunami hazard mapping and structural design guidelines of ASCE 7-16 would be used rather than those in FEMA P-646.
Once the 2018 IBC is published in the fall, interested parties will have only a few months to develop code changes that will result in the 2021 I-Codes. Similar to this last cycle, code changes will be divided into two groups, Group A and Group B, and Group A code changes are due January 8, 2018. The schedule for the next cycle is already posted here.
What changes would you like to see for the 2021 codes?
Sneak Peek: Our New and Improved Deck Design Guide
One of the ways I get through winter every year is by looking forward to the weekend in March when we set our clocks ahead and “spring forward” into Daylight Savings time. Some people don’t like this change because of the lost hour of sleep, but to me it means the weather shouldn’t be cold for much longer.
The coming of spring means getting to walk to the car in daylight at the end of the workday. It also means getting the garden started for the year and spending more time outside in general.
Of course, I’m not alone in being happy to see winter go.
In the residential world, the phenomenon of “deck season” coincides with this time of year. Homeowners with decks are getting ready for summer by giving their decks a cleaning and looking them over for any needed maintenance. Now’s the time that new or replacement decks are being planned and built to be enjoyed for the rest of the year.
It’s no coincidence, then, that our deck-code guide has been updated again in time for warmer weather. The Deck Connection and Fastening Guide goes detail by detail (ledger connection, joist-to-beam connection, beam-to-post connection, etc.) through a typical deck and identifies the relevant building-code requirements (2012 and 2015 IRC/IBC) and connection options.
Our deck-code guide can be a helpful reference to an engineer who is just getting acquainted with decks, and can also bring you up to speed on revisions to the IRC that can necessitate engineering changes to even a relatively simple residential deck. Multilevel decks, guardrail details, ledger details and foundation challenges are all examples of things a deck builder could call you for assistance with.
For more information on resources available to engineers on deck design, feel free to consult my previous blog article, Wood-framed Deck Design Resources for Engineers.
The Deck Connection and Fastening Guide
F-DECKCODE17
This guide provides instructions on how to recognize defects and deficiencies in existing decks, and guidance for building a strong, safe, long-lasting new or renovated deck structures.
For more deck-related blog posts, check out the links below:
Building Code Update: 2018 IBC to Reference ASCE 7-16
In early December, ICC posted the preliminary results of the Group B Online Governmental Consensus Vote, which included structural changes to the IBC, IEBC and IRC. ICC reports that there were more than 162,000 votes cast by eligible Voting Members during the three-week online voting period.
One subject of interest to building Designers, builders and some building-material suppliers was the disposition of a group of code changes that adopted ASCE 7-16 as the reference standard on loads for the IBC and IRC, and changed other parts of the IBC and IRC to reflect that.
The most controversial part of adopting the new ASCE 7-16 standard was its increase in roof component and cladding loads. The higher pressure coefficients in some cases raised the concern that the cost of roofing, roofing materials and roof repairs would be increased. Other items that raised some opposition were the new chapter on tsunami loads and the increase in deck and balcony live loads from 40 psf to 60 psf.
Despite these concerns, ICC members voted to approve the code change that adopted ASCE 7-16 as the reference for loads in the 2018 IBC, IRC and IEBC.
Along with that specific change, several other related changes were approved to correlate the IBC with adoption of ASCE 7-16. These included changes to Section 1604, General Design Requirements; adding in a new Section 1615 on Tsunami Design Requirements; modifications to Section 1613 so that seismic design requirements match ASCE 7-16; and deletion of Section 1609.6, Alternate All-Heights Method for wind design. On this last item, the argument was that since ASCE 7 now includes a simplified wind load design method, a competing method is not needed in the IBC.
Interestingly, a change to remove Strength Design and Allowable Stress Design load combinations from the IBC, which was approved by the IBC Structural Committee, was overturned and denied by the ICC Member voters. So those will remain in the IBC.
For the IRC, even though ASCE 7-16 will be shown as the referenced load standard, most changes to the actual code language relating to the new standard were denied. Items that were specifically denied included adoption of ASCE 7-16 wind speed maps, adoption of ASCE 7-16 roof pressure loading, and adoption of the new higher deck and balcony live loads. So the result is that the IBC and IRC will again be inconsistent with each other regarding wind design. On the other hand, the new USGS/NEHRP Seismic Design Maps were approved.
Future Code Corner articles will address other changes approved for the 2018 IBC and IRC.
Concrete Anchorage for ASD Designs
One of the first things I learned in school about using load combinations was that you had to pick either Load and Resistance Factor Design (LRFD)/Strength Design (SD) or Allowable Stress Design (ASD) for a building and stick with it, no mixing allowed! This worked for the most part since many material design standards were available in a dual format. So even though I may prefer to use LRFD for steel and ASD for wood, when a steel beam was needed at the bottom of a wood-framed building that was designed using ASD load combinations, the steel beam could easily be designed using the ASD loads that were already calculated for the wood framing above since AISC 360 is a dual- format material standard. And when the wood-framed building had to anchor to concrete, ASD anchor values were available in the IBC for cast-in-place anchors and from manufacturers for post-installed anchors in easy-to-use tables, even though ACI 318 was not a dual-format material standard. (Those were good times!)
Then along came ACI 318-02 and its introduction of Appendix D – Anchoring to Concrete, which requires the use of Strength Design. The 2003 IBC referenced Appendix D for Strength Design anchorage, but it also provided a table of ASD values for some cast-in-place headed anchors that did not resist earthquake loads or effects. This option to use ASD anchors for limited cases remained in the 2006, 2009 and 2012 codes. In the 2015 IBC, all references to the ASD anchor values have been removed, closing the book on the old way of designing anchors.
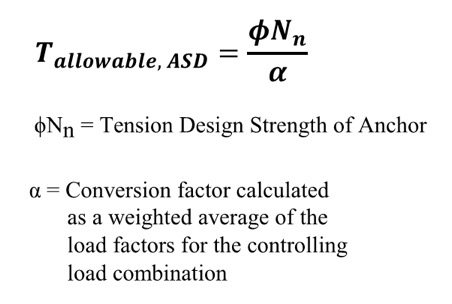 So what do you do now? Well, there is some guidance provided by ICC-ES for manufacturers to convert calculated SD capacities to ASD allowable load values. Since there is no conversion procedure stated in the IBC or referenced standards, designers may want to use this generally accepted method for converting anchor capacities designed using ACI 318. ICC-ES acceptance criteria for post-installed mechanical and adhesive anchors (AC193 and AC308) and cast-in-place steel connectors and proprietary bolts (AC398 and AC399) outline a procedure to convert LRFD capacities to ASD using a weighted average for the governing LRFD/SD load combination. So if the governing load combination for this anchor was 1.2D + 1.6L and the dead load was 1,000 pounds and the live load was 4,000, then the conversion factor would be (1.2)(0.2) + (1.6)(0.8) = 1.52 (keep in mind that the LRFD/SD capacity is divided by the conversion factor in the ICC-ES equation shown here for tension).
Right away, there are a few things that you may be thinking:
- What about load factors that may exist in ASD load combinations?
- It may just be easier to just recalculate my design loads using LRFD/SD combinations!
- The resulting allowable loads will vary based on the load type, or combination thereof.
- If the ACI 318 design strength is limited by the steel anchor, then the conversion will result in an allowable load that is different from the allowable load listed for the steel element in AISC 360.
Let’s take a look at these objections one by one.
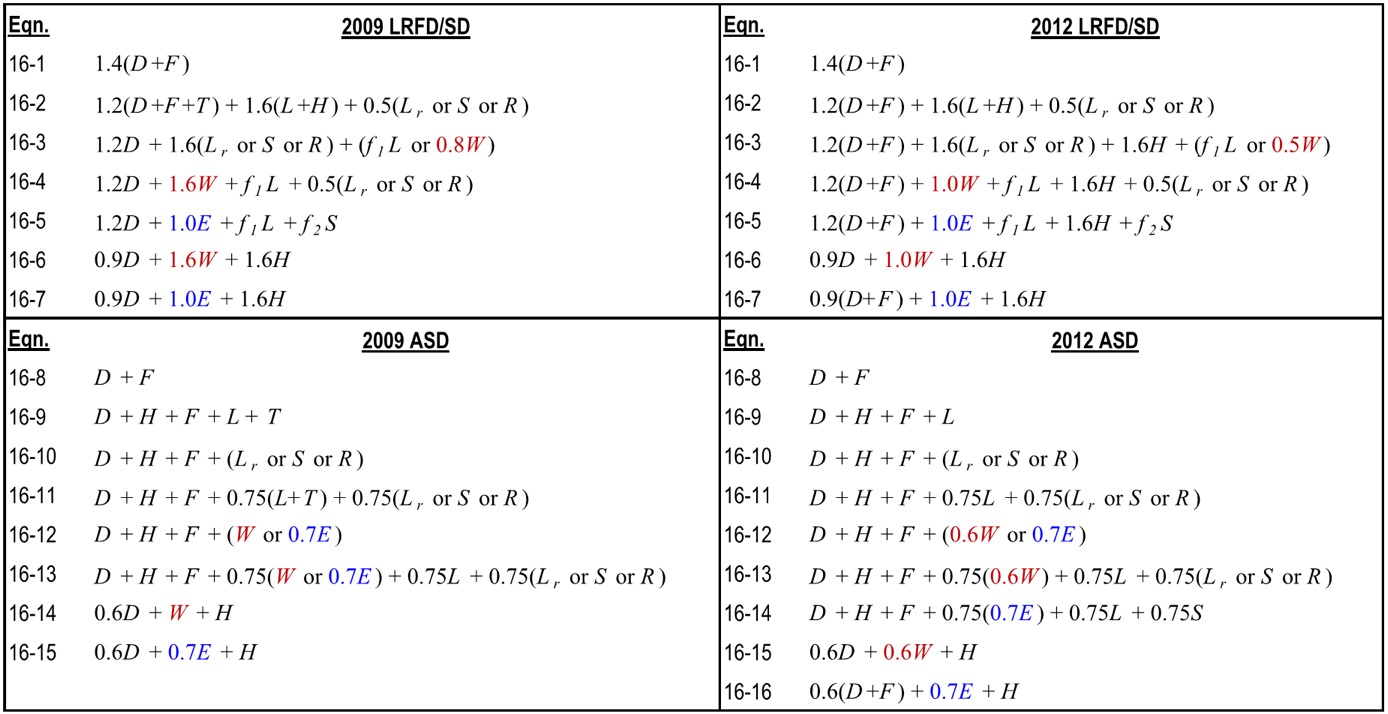
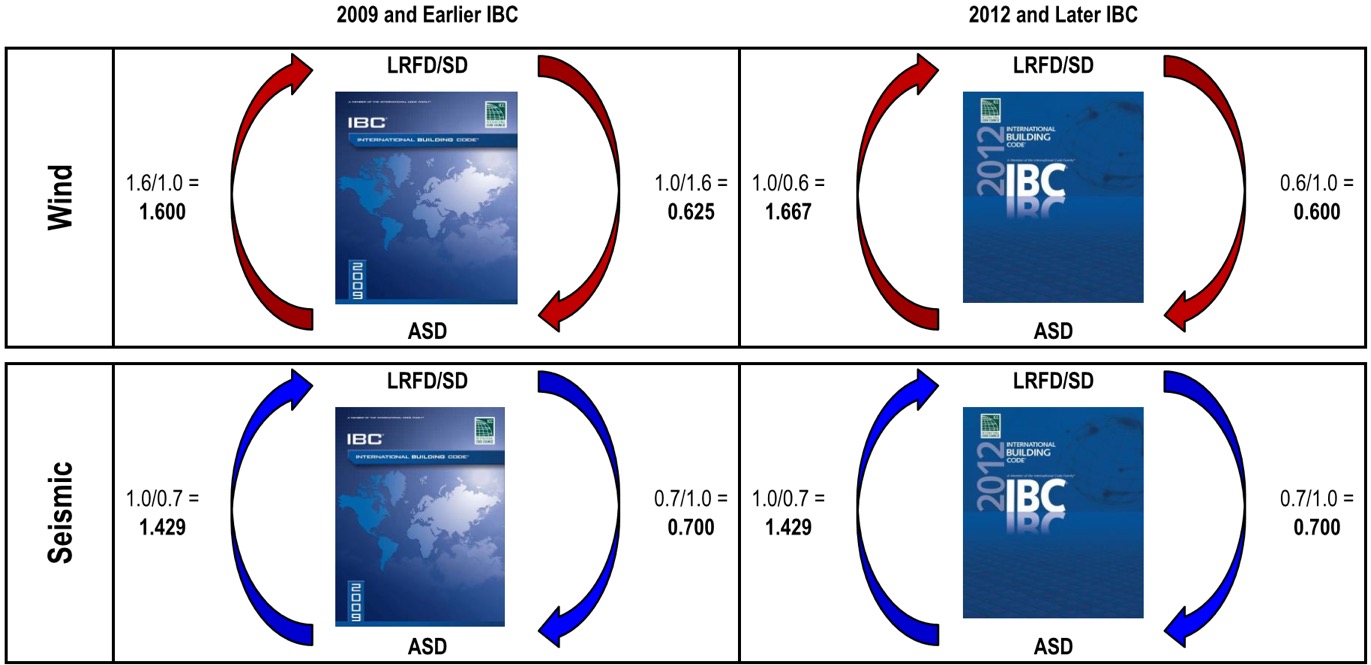
Item 1: Since unfactored earthquake loads are determined at the ultimate level in the IBC, they have an LRFD/SD load factor of 1.0 and an ASD load factor less than 1.0, which is also true for wind loads in the 2012 and 2015 IBC (see graphic below). Using the LRFD/SD load factor of 1.0 obviously does not convert the capacity from LRFD to ASD so you must also account for ASD load factors when calculating the conversion factor. To do so, instead of just using the LRFD load factor, use the ratio of LRFD Factor over ASD Factor. So if the governing load combination for an anchor was 0.9D + 1.0E and the dead load was 1,000 pounds and the seismic load was 4,000, then the conversion factor would be (0.9)(0.2) + (1.0/0.7)(0.8) = 1.32.
Item 2: Even though the weighted average conversion requires you to go back and dissect the demand load into its various load types, often this can be simplified. ICC-ES acceptance criteria permit you to conservatively use the largest load factor. The most common application I run into is working with ASD-level tension loads for wood shearwall overturning that must be evaluated using SD-level capacities for the concrete anchorage. Since these loads almost always consist of wind or seismic loads, using the largest factor is not overly conservative. Depending on the direction in which you are converting the demand loads or resistance capacities, the adjustment factors are as shown in the figure below. Affected Simpson Strong-Tie products now have different allowable load tables for each load type. (For examples, see pp. 33-36 of our Wood Construction Connectors catalog for wind/seismic tables and pp. 28-30 of our Anchoring and Fastening Systems catalog for static/wind/seismic tables.)
Item 3: I am unsure whether there is any sound rationale for having allowable loads for an anchor resisting 10% dead load and 90% live load differ from those of an anchor that resists 20% dead load and 80% live load. Perhaps a reader could share some insight, but I just accept it as an expedience for constructing an ASD conversion method for a material design standard that was developed for SD methodology only.
Item 4: We have differing opinions within our engineering department on how to handle the steel strength component of the various SD failure modes listed in ACI 318. Some believe all SD failure modes in ACI 318 should be converted using the load factor conversion method. I side with others who believe that the ASD capacity of a steel element should be determined using AISC 360. So when converting SD anchor tension values for a headed anchor, I would apply the conversion factor to the concrete breakout and pullout failure modes from ACI 318, but use the ASD steel strength from AISC 360.
Finally, I wanted to point out that the seismic provisions in ACI 318, such as ductility and stretch length, must be considered when designing anchors and are not always apparent when simply converting to ASD. For this reason, I usually suggest converting ASD demand loads to SD levels so you can use our Anchor Designer™ software to check all of the ACI 318 provisions. But for some quick references, we now publish tabulated ASD values for our code-listed mechanical and adhesive anchors in our C-A-2016 catalog — just be sure to read all of the footnotes!
A Tale of Two Houses: Design Loads for Metal Plate Connected Wood Trusses
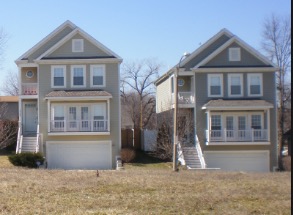
Take two trusses with identical profiles and environmental surroundings, and they should have the same design loads, right? Early in my career, I recall hearing a story about two identical buildings right next to each other that were designed for two different magnitudes of environmental loads. I remember wondering – how do the loads know which building is which?
There used to be a time when it was not uncommon for 5 substantially different wood truss designs to come from 5 different companies – all designing to the exact same spec. Whereas some differences are always to be expected (manufacturer-specific plate design values and proprietary analogues come to mind), the truss design disparities that used to exist from one company to the next were compounded by variations in something which really shouldn’t vary at all – the application of the specified loads to the truss. Differences in loading can occur whenever there is room for interpretation. In cases where the loading specs for fabricated wood trusses are not very detailed, there is a lot of room for interpretation. And when that happens, everyone knows how many different answers you get when you ask 5 different engineers!
Fortunately, the truss industry has come a long way in this area. In some cases, the codes and standards that govern the loading of structures have improved and helped the cause. But the truss industry also made a concerted effort to minimize these loading differences. Everyone agreed that a truss bid shouldn’t be won based on “less loading,” so they set out to change that. One of the best efforts in accomplishing this was the development of the SBCA Load Guide entitled “Guide to Good Practice for Specifying & Applying Loads to Structural Building Components.” Produced by the Structural Building Component Association (SBCA) in cooperation with the Truss Plate Institute (TPI), the Load Guide was developed with the stated goal of “helping everyone that uses it to more easily understand, define and specify all the loads that should be applied to the design of each structural building component” and “to help assure that all trusses will be designed using a consistent interpretation and application of the code.”
If you are an architect, engineer or a Building Code Official who deals with trusses and you don’t already have the current SBCA Load Guide, I strongly encourage you to check it out (free downloads are available from the SBCA website here.) When fielding questions about loading on trusses, I inevitably refer the inquiring party to the SBCA Load Guide not only for the answer to the question, but for future reference as well. The SBCA Load Guide isn’t just a handy reference to read, it also offers a spreadsheet tool that can be used to calculate loads as well as output the load calculation worksheets. The worksheets can be submitted with the construction documents for plan approval or submitted to the truss manufacturer to be used in the design process.
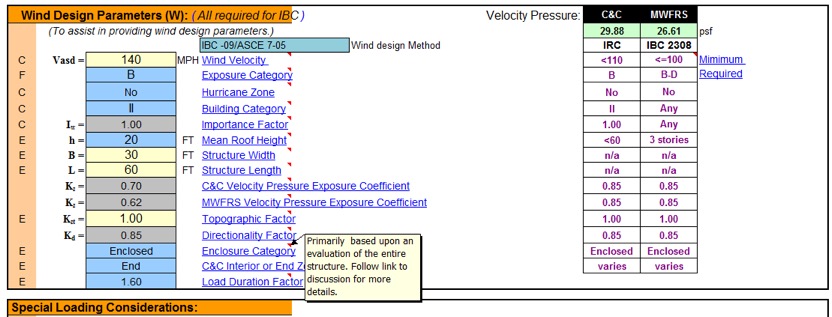
In addition to providing all of the code and standard loading provisions that apply to metal-plate-connected wood trusses, the SBCA Load Guide also presents the truss industry’s consensus positions and interpretations on provisions that are either unclear as to how they apply to trusses or that have resulted in loading inconsistencies in the past. With the many truss-specific examples and applications covered, it leaves very little room, if any, for further interpretation or question as to how the various code provisions should be applied to trusses.
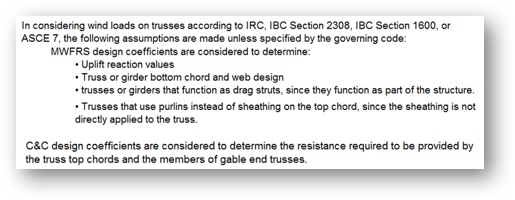
Take wind loads, for example. Wind loading on trusses has been a heavily debated topic over the years, such as whether a truss should be designed for Components & Cladding (C&C), Main Wind Force Resisting System (MWFRS) or both. In fact, wind loading used to be one of the main sources of inconsistencies in truss designs from one company to another. The truss industry has since established a consensus position on this matter and the SBCA Load Guide presents it as follows:
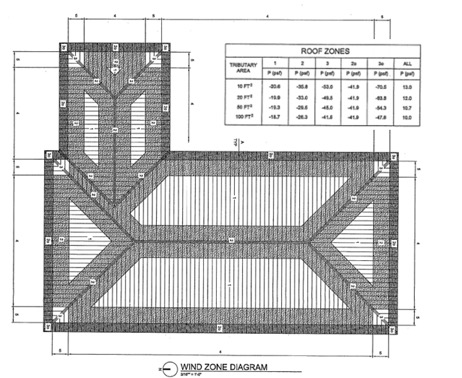
The SBCA Load Guide also pulls information from a variety of resources to help provide more insight into some of the code provisions. For example, in the wind loading section a graphic is reproduced from a Structural Engineers Association of Washington’s handbook (SEAW RSM-03) to clarify the effect of wind directionality on C&C wind pressures for gable/hip roofs, since this consideration is not made clear in ASCE 7.
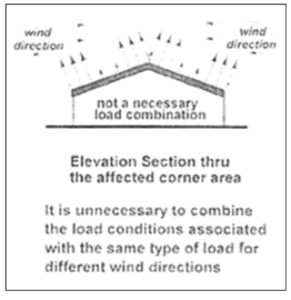
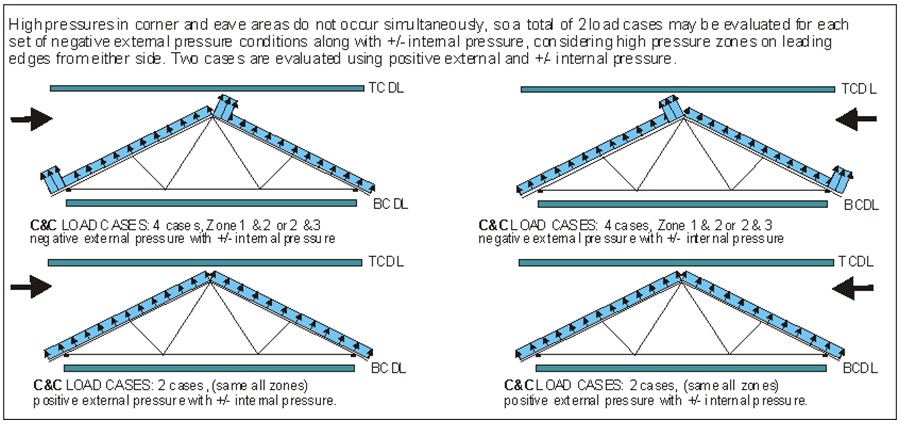
This clarification is further illustrated in the example wind loading diagrams, which show how wind pressures are evaluated when taking the directionality of the wind into account, i.e., by evaluating the pressures separately with the wind from the left and from the right.
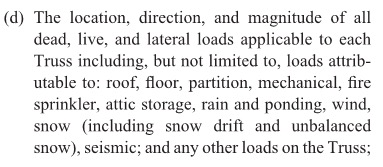
Of course, the SBCA Load Guide is only a guide and is NOT intended to supersede a Building Designer’s design specification. As specified in ANSI/TPI 1, the Building Designer is responsible for providing all applicable design loads to be applied to the trusses:
If you are an architect or engineer who specifies detailed loading schedules for truss systems, great! Your specifications may not need the SBCA Load Guide to ensure that the trusses are accurately loaded as intended in the design of the building. But the SBCA Load Guide still provides a lot of insight as to how the truss industry – and anyone who uses the Load Guide – applies various code provisions to trusses. It might even be an interesting study to see how your specified loads compare to the loading examples in the SBCA Load Guide.
For everyone else who isn’t well-versed in the application of code provisions to wood trusses, the SBCA Load Guide is an invaluable tool. Building Designers, building code officials, truss technicians and truss Designers can all benefit from the Load Guide. As stated in the SBCA Load Guide, one of the industry’s goals is to achieve a greater level of consensus among the largest audience possible on how to load trusses and other structural building components. The more people who read and use the SBCA Load Guide, the more consistency there will be in the interpretation and application of code provisions pertaining to wood trusses, which will help make projects run smoother and most importantly, improve building safety. At Simpson Strong-Tie, we are big fans of tools that work to do that.
If you’ve had experience using the SBCA Load Guide, we’d love to hear about it – please let us know in the comments below!
Firewalls for Wood Construction
What is a firewall?
A firewall is a term that is used in the construction industry to describe a fire-resistive-rated wall or fire-stop system, which is an element in a building that separates adjacent spaces to prevent the spread of fire and smoke within a building or between separate buildings. A firewall is actually one of three different types of walls that can be used to prevent the spread of fire and smoke.
Types of fire-resistive-rated walls:
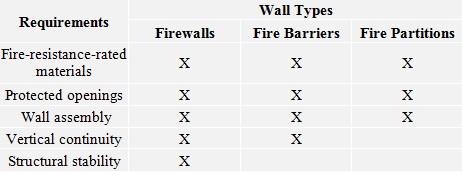
The three types of fire-resistive-rated walls are firewalls, fire barriers and fire partitions. They are listed in order from the most stringent requirements to the least. A firewall is a fire-resistive-rated wall having protected openings, which restricts the spread of fire and extends continuously from the foundation to or through the roof with sufficient structural stability under fire conditions to allow collapse of construction on either side without collapse of the wall. A fire barrier is a fire-resistive-rated wall assembly of materials designed to restrict the spread of fire which continuity is maintained. A fire partition is a vertical assembly of materials designed to restrict the spread of fire in which openings are protected. Each type has varying requirements and the table below displays some of the differences between them.
 What are some of the typical uses of each type of fire-resistive wall?
As the requirements for each type of wall vary, so do the uses. Typical uses of each are as follows:
- Firewalls – party walls, exterior walls, interior bearing walls
- Fire barriers – shaft enclosures, exit passageways, atriums, occupancy separations
- Fire partitions – corridor walls, tenant space walls, sleeping units within the same building
How do you determine whether your wood building design needs a firewall?
The 2012 International Building Code (the IBC, or “the Code” in what follows), which is adopted by most building departments in the United States, is the resource we are using in this discussion. (As a side note, it’s possible your city or county has supplemental requirements, and it is best to contact your local building department for this information up front.)
To determine your fire-resistive wall requirements, review these chapters in the 2012 IBC:
- Chapter 3, Identify Occupancy Group – typically Section 310 (“Residential Group”) for wood construction
- Chapter 5, Select Construction Type – Section 504, Table 503
- Chapter 6, Determine Fire-Resistive Rating Requirements – Table 601, typically Type III wood-constructed buildings require a two-hour fire separation for the exterior bearing walls
What are typical fire-resistive wall designs?
Information for one-hour, two-hour designs, etc. can be found in tables 721.1(2) and 721.1(3) of the Code provide information to obtain designs that meet the rating requirements (in hours) for your building, including the walls and floor/roof systems. The GA-600 is another reference that the Code allows if the design is not proprietary.
How do I know whether the structural attachments I specify for the wall and roof assemblies meet the Code requirement?
Once the wall or floor/roof assembly design is selected, the Designer must ensure that the components of the wall do not reduce the fire rating. The Code requires that products which pierce the membrane of the assemblies at a hollow location undergo a fire test to ensure they meet the requirements of the design. ASTM E814 and ASTM E119 are the standards governing the fire tests for materials and components of the fire-resistive wall. There are several criteria that the component in the assembly must meet: a flame-through criterion, a change-in-temperature criterion and a hose-stream test.
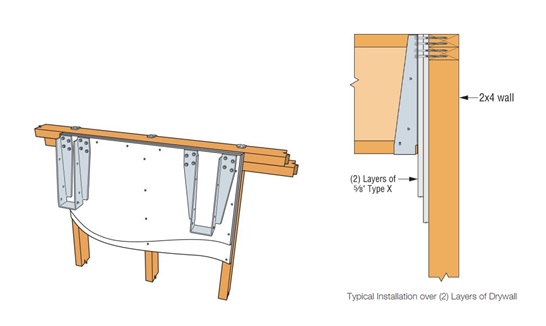
Simpson Strong-Tie has created the DHU hanger for use with typical two-hour fire-resistive walls for wood construction.The DHU hanger has passed the ASTM E814 testing and can be used on a fire-resistive wall of 2×4 or 2×6 constructions and up to two 5/8″ layers of gypsum board. The DHU and DHUTF have both an F (Fire) and a T (Temperature) rating.
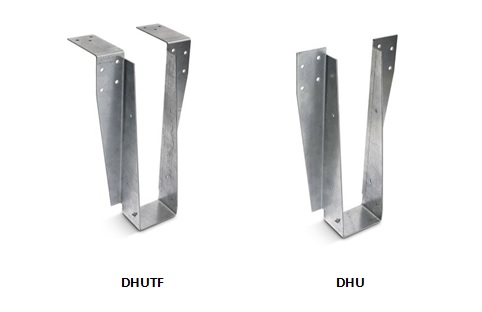 The DHU/DHUTF hanger has two options, a face-mount version (DHU) and a top-flange version (DHUTF). The hanger doesn’t require any cuts or openings in the drywall, which ensures reliable performance; no special inspection is required. To install the hanger, gypsum board must first be installed in a double or single layer, at least as deep as the hanger. For installation, apply a two-layer strip of Type X drywall along the top of the wall, making the base layer a wider strip (bottom edge is 12″ or more below the face layer, depending on jurisdiction). Then install ¼” x 3½” Simpson Strong-Tie Strong-Drive® SDS screws through the hanger and into top plates of the wall. Since the hanger is more eccentric than typical, the top plates of the wall must be restrained from rotation. The SSP clip can be used for restraint, but the design may not require it if there is a sufficient amount of resistance already in place, such as sheathing, a bearing wall above, or a party wall as determined by the designer. See the photos and installation illustration below for guidance or visit our website for further information.
Deck Guardrail Update
This post is an update to David Finkenbinder’s post on Guard Post Resources from August 13.
As David explained, the requirements in the IRC and IBC for guards are intended to prevent people from falling off of raised surfaces. The failure of this guard is a common source of injuries caused by failures of deck components.
Section R312.1.1 of the 2012 International Residential Code (IRC) states that “Guards shall be located along open-sided walking surfaces, including stairs, ramps and landings, that are located more than 30 inches measured vertically to the floor or grade below at any point within 36 inches horizontally to the edge of the open side.”
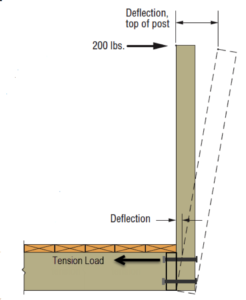
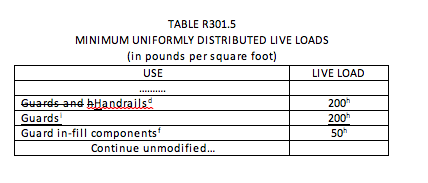
Table 301.5 of the 2012 IRC requires that guards and handrails be designed for “[a] single concentrated load” of 200 pounds “applied in any direction at any point along the top.”
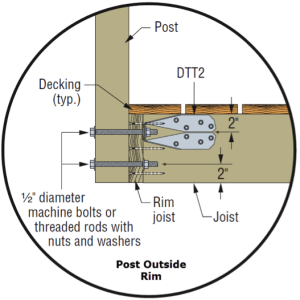
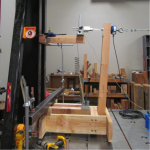
David mentioned the article Tested Guardrail Post Connections for Residential Decks, which described a testing program at Virginia Tech that examined the ability of various assemblies to resist this concentrated load at the top of the guard post. But rather than test in any direction, the researchers decided to test in what they considered the most critical direction: outward away from the deck.
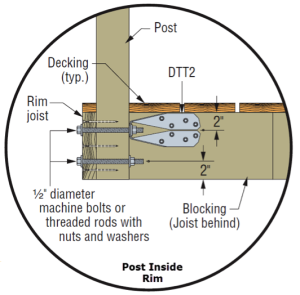
Simpson Strong-Tie subsequently developed a new tension tie, the DTT2Z, to make an economical connection from the top bolt in a deck post back into the framing of the deck to resist the high tension forces that develop in the top bolt when the top of the post is pushed outward. Several details were developed to try to address the various orientations of the post and deck framing.
To allow evaluation of assemblies used to resist this deck guardrail force, ICC-ES developed AC273, Acceptance Criteria for Handrails and Guards. AC273 is available for purchase through the ICC bookstore.
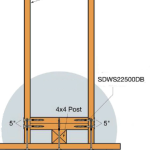
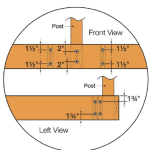
Even with the connectors being readily available, deck builders have asked for guard post connection details that do not involve the use of connection hardware. So Simpson Strong-Tie again tested several framing configurations according to the AC273 criteria, using our Strong-Drive® SDWS TIMBER screws and additional blocking to try to prevent the post from rotating. These details are shown in the engineering letter L-F-SDWSGRD15.
That brings us to the update part.
A committee made up of building officials, manufacturers, deck builders, designers and other interested parties is currently developing a set of code proposals on deck construction for inclusion in the 2018 International Residential Code (IRC). Even though more and more deck information has been incorporated into the last few editions of the IRC, there is still insufficient information in the code to be able to completely build a deck prescriptively. One area of interest is this guard connection. There is a desire to develop prescriptive details for both connection of a 4×4 post to deck framing with blocking and fasteners and for connecting the deck band joist back to the deck framing so that pre-manufactured guard rails can simply be fastened to the deck band with the knowledge that the connection is secure.
The problem is that, with the current requirement, the guard must resist the 200-pound load in ANY direction. All current testing, including AC273, only uses testing in the outward direction away from the floor of the deck. If the post were really required to resist a 200 pound load in the inward direction as well, then two hardware connectors would be required, one on each bolt. However, the belief of the committee is that resistance of 200 pounds in the outward and downward direction is primarily what is needed to ensure the safety of the occupants of the deck.
So they are working on a code proposal to change Table R301.5 of the IRC to require that the guard only resist the 200 pounds in the outward and downward direction and reduce the load to 50 pounds in the inward and upward direction.
The committee recognizes that while this is not necessarily a departure from current practice, it is a departure from current loading requirements in the IRC, IBC, and ASCE 7. So representatives of Simpson Strong-Tie met on September 30 with the NCSEA Code Advisory Committee – General Requirements Subcommittee to get the opinions of this group of active structural engineers. They provided valuable input, including the consideration that at some locations near landings and other changes in elevation, resistance to 200 pounds in the inward direction could be important.
Prior to incorporation of NCSEA’s input, the committee thought the code change might look as shown below.
We are interested in getting additional comments on this code proposal. What do you think? Let us know in the comments below.
d) A single concentrated load applied in any direction at any point along the top, in pounds.
f) Guard in-fill components (all those except the handrail), balusters and panel fillers shall be designed to withstand a horizontally applied normal load of 50 pounds on an area equal to 1 square foot. This load need not be assumed to act concurrently with any other live load requirement.
h) Glazing used in handrail assemblies and guards shall be designed with a safety factor of 4. The safety factor shall be applied to each of the concentrated loads applied to the top of the rail, and to the load on the in-fill components. These loads shall be determined independent of one another, and loads are assumed not to occur with any other live load.
j) A single concentrated load applied at any point along the top, in pounds. The 200-pound load is required to be applied in either the outward or downward direction, and it is permitted to be reduced to 50 pounds in either the inward or upward direction. The guard is not required to resist these loads applied concurrently with each other.
Strong-Wall Bracing Selector: Bridging the Gap between Engineered Design and Prescriptive Construction
Asking a structural engineer to design wall bracing under the IRC® can be like asking a French pastry chef to bake a cake using Betty Crocker’s Cookbook. The temptation is to toss out the prescriptive IRC recipe and design the house using ASCE 7 loads and the AWC SDPWS shear wall provisions per the IBC®. But if only a portion of the house needs to be engineered, there may be an easier option.
The prescriptive IRC states an IBC engineered design “is permitted for all buildings and structures and parts thereof” but the design must be “compatible with the performance of the conventional framed system.” But how exactly does an IRC braced wall panel perform? The code doesn’t come right out and tell us, but there are two bracing methods that are essentially shear walls masquerading as braced wall panels: Method ABW and Method BV-WSP. Backing into their allowable loads gives us the key to determining equivalence and eliminates the need to develop lateral forces.
But before you can bust out the slide rule and start crunching numbers, you need to figure out how much bracing the prescriptive code requires. We developed our Wall-Bracing-Length Calculator in 2010 to help designers do just that. And last month, we launched our Strong-Wall® Bracing Selector tool to make it easier to specify equivalent solutions for tricky situations.
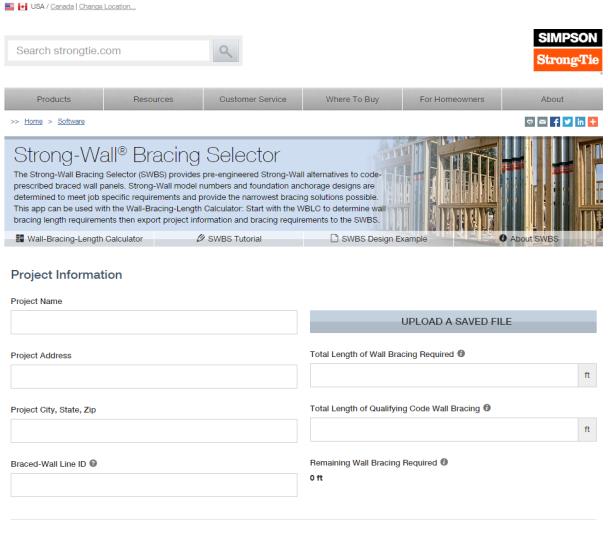
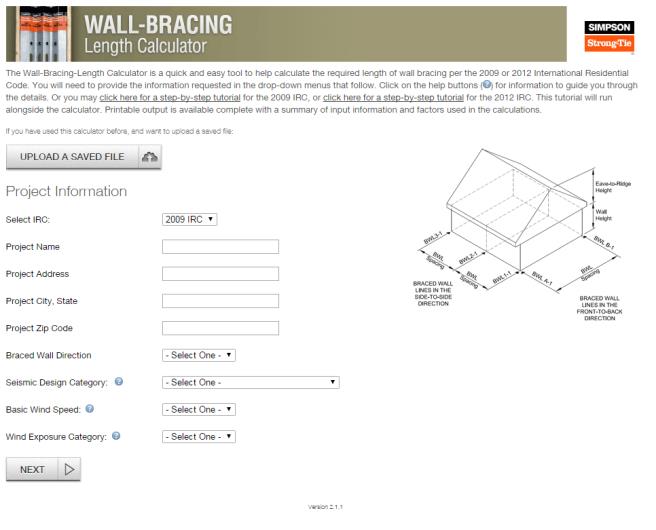
You can export the required lengths (and project information) from the Wall-Bracing-Length Calculator directly into the Strong-Wall Bracing Selector or you can manually enter in the required lengths. The selector app will provide a list of Strong-Wall panels that have an equivalent length, evaluate their anchorage loads and return a list of pre-engineered anchor solutions for a variety of foundation types.
If you’re familiar with our Strong-Wall Prescriptive Design Guide (T-SWPDG10), the selector automates this 84-page document in just a few steps. One big upgrade is the ability to select a solution to meet the exact amount of bracing that is required. If you needed 2.8-ft. of wall bracing, you have to round up to the tabulated 4-ft. solutions if you are using the guide, but now you can select a wall solution that is equivalent to 2.8-ft., which might mean a smaller wall width or better anchor options. You also have the ability to save the selector file for later modifications, create a PDF of the job-specific output, or email the PDF directly from the program.
So next time you get asked to “design” some wall bracing, see if our Wall-Bracing-Length Calculator and Strong-Wall Bracing Selector might save you some time. There is a tutorial and a design example on the Bracing Selector web page, but it’s very easy to use so you may just want to dive right in. I should also point out that the Strong-Wall SB panels have not yet been implemented into the program, but bracing information for them is available on strongtie.com in posted letters for wind (L-L-SWSBWBRCE14), seismic (L-L-SWSBSBRCE14), and seismic with masonry veneer (L-L-SWSBVBRCE14).
Let us know what you think of this new tool in the comments below.


